
Hello all, and welcome to my Explorative Research and Praxis project. In this post, I will be going through all the pathways and tangents that I have taken since the beginning of this project. Starting with my initial thoughts and what I could possibly do, I went on to deep dive into narrative as a whole while also looking into myself and what artistic techniques I could explore to help further my confidence in narrative and storytelling work. To finish off, I will be going into detail on what pathways I will continue to explore after this module has taken place as well as the techniques I hope to develop and look into.
Initial Mind Mapping
When I was first given the brief, it was my understanding that the main task for this module was to take a stand back from how we typically go through projects and experience as many options as possible rather than following one singular journey from A to B. However, as I am an autistic artist, my way of going through a project can be seen as completely different when compared to how it is done by a neurotypical student. Usually, when it comes to projects, I start with an explosion of ideas that I tend to go down at first before I have to trim them down until it is one cohesive idea that I follow until the end. Since this module has no expectation for an end result and supports the exploration of different things, I have decided that with this project I will not be trimming away any avenues I explore and just let them naturally come to an end. This will allow me to experiment and research multiple varying pathways with as much depth as I can put in while also helping me critically analyse which tasks take up too much time as well as tasks that diminish my interest over time.
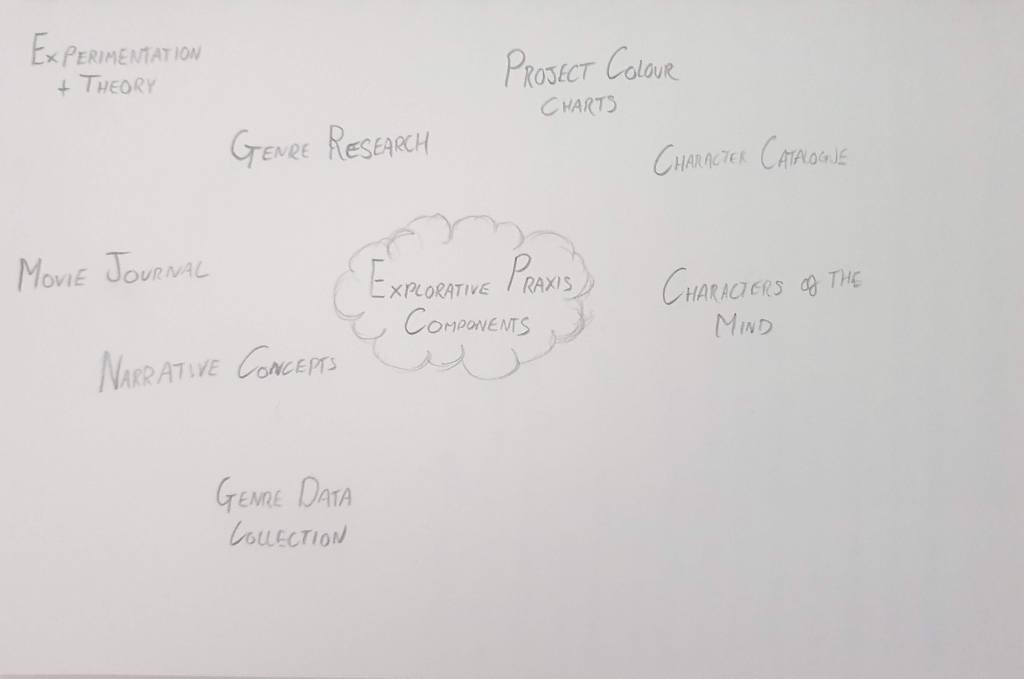
Once I was given the brief, I jotted down the main sources of work I wanted to pull together and use as components for this project. These aspects are a collection of topics and bodies of work that I have been working on and off with for my whole journey as an artist, where more recently I have been trying to collate it in their own large file format so they can all be in one place rather than scattered across note pages and sketchbooks. I knew from the get-go that I wanted to work more in-depth with these bodies of work and use this module as a way to make these projects my primary focus rather than a random group of side projects that I would work on to take a break from my work during my undergraduate degree. The main goal for this module would be to deep dive into all of these mediums and find new ways to bring them to life as well as find out new information to bring into them so that they have more depth and underpinning put within them.
What I could do / What I could research
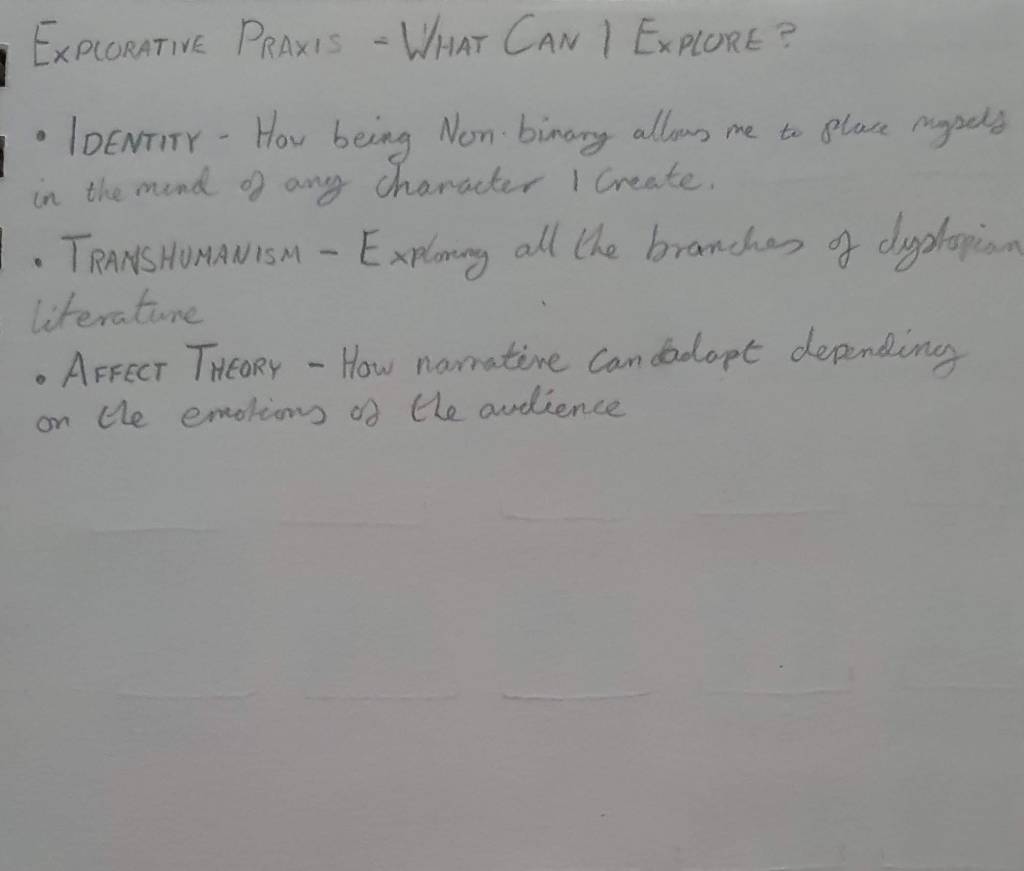
After writing down what core aspects I wanted to work on for this module, I was left with a couple of questions on how I could be able to tackle the next steps of this project. The main problems I first encountered were how could I experiment and what I could explore, which in other words translates to what I could create physically and what I could research. I knew that we were given free rein with what we could look into as well as not provided a cap point on how many avenues we could venture down. Therefore, I decided to write down as many things my mind could come up with at the time and what practices I could work with in collaboration with the core aspects I had jotted down before. This led to a lengthy list of materialistic practices that I could work with to create physical things to showcase what I wanted to work on. However, when it came to what I wanted to research, there were only 3 key things that struck out in my mind on what I could look at from the theory side of things. Since my handwriting is abysmal and can be very difficult to interpret, I took the liberty to type out what I have written so that you can have a better context of where my thoughts were at during the beginning of this module.
What I can explore? – Theoretical Underpinning
- Identity – How being non-binary allows me to place myself in the mind of any character I create.
- Transhumanism – Exploring all the branching forms of dystopian literature.
- Affect Theory – How narrative can adapt depending on the emotions of the audience.
How can I experiment/play? – Explorative Research
- Mark making on Steves – Exploration of colour/layers
- Paper Cuttings – Creating characters that pop out of the page
- Mask Moulding – Experimenting with a 3D expression of emotion
- Model Making – Creating 3D forms of characters (Non-Steves)
- Drawing Form – Exploring the shape and stature of characters
- Application of Genre Research – Showcase certain characters to suit their specific genre designations
- Adding Narrative – Drawing from people-watching and giving them a unique story
- Environment Making – Creating 3D models of spaces where characters would reside
- Illustrative Process – Design how a character forms in my head in an illustrative style
- Stop Motion – Play and experiment with stop motion as a process

Illustrated Character Creation Process – Starting Point
So before I dived head first into research and making, I knew that I needed to create some form of visualisation of my character creation process since that whole practice was what inspired me to become an artist in the first place. Before I started my journey as an artist, I found a lot of joy in creating my own narrative and character concepts as, for me, characterisation and adding narrative to mundane things is how best my imagination works and I would do this randomly to pass the time. Over the years, I have refined this process to the point where I have a backlog of hundreds of characters that are sitting collecting dust in a spreadsheet that I refer to as the ‘Character Catalogue’. The main reason why they have been in the dark is due to how my mind works and being stuck in a negative loop that stopped me from drawing these characters out, fixating on the fact that they will never look like how I actually perceive them in my mind. However, since participating in Inktober for the past couple of years and learning to love my own illustrative style, I have started to gain confidence in my skills as an illustrator and wanted to use this module as a way to practice drawing characters in hopes that I could finally shed some dust from the catalogue itself.
To summarise how characterisation works inside my head, it follows 4 simple stages that help build it up layer by layer until you have a finished (sort of) product. Firstly, like how most things start out, you begin with a blob. Now this blob doesn’t have to be the most perfect, prettiest blob of them all, if anything all blobs are equal in this process of thinking, it can stem from anything that pops into your head. This can range between a joyous spark of inspiration that came to you within a moment of eureka, or it could be a garbled-up mess of memory that you groggily jotted down notes of a dream that you wrote in a semi-awake state. No matter what this blob contains, this will be the barebones starting point you will work from and add to in further stages.

Illustrated Character Creation Process – Shaping The Blob
This next stage is what I refer to as ‘Shaping the Blob’, where you add a base level of detail that will help form the blob into a structurally sound shape to add more things onto. Now depending on the simplicity of the character this could be considered a stopping point since some characterisations are comedic gimmicks and only really need a few minutes of added details to help them take more form than just a basic concept. However, I believe that all characters should be applied to this process as they can be given added depth this way and become more relatable and less forgettable. At this point in the process, the only details that should be added are the basics which allow your character to take shape. These details include what type of character it is as well as where their moralities lie, deciding if they are the main focus of the story or a secondary piece to the puzzle to help build up a narrative. You should also include what skills the characters possess as well as where their ideals lie to give them more of a unique standpoint as well as begin to breathe life into what they would do within the boundaries of your story.
Illustrated Character Creation Process – Adding Details to The Blob
The following stage involves adding the little details to help flesh out your character, allowing for the creation of who they were before embarking on what you plan for them in your story. This step helps fill in more personal features for the character as well as include more stepping stones and information into their history to create a profile for people to relate to and attach to. This usually involves finalising details on what they look like, ranging from their body type and build, as well as any unique features that they may possess which can range from subtle things, like beards and piercings, to more extreme ends of the spectrum like missing limbs and battle scars. Since it is better to both show and tell rather than just one or the other, it is always a great feature to tie in links to the character’s history with their personal appearance, as people tend to use their style and the way they present themselves as a form of showcasing who they are and what they have gone through. Through the additions of these details, you can also look more into their history and stem more information that can directly affect the character themself and how they perceive the world through what has come before. This can include looking into their family as well as past relationships that the character has been a part of, while also taking into account what key life events the character has encountered throughout their time alive. After all, a character isn’t born at the beginning of every story, so there must be some occurrences of conflict/triumph to help mould them into the person we hope to introduce.

Illustrated Character Creation Process – Breathing Life into The Blob
Now when everything has been put into place and all aspects of the character have been decided, this is the stage in the process where you begin to breathe life into the character and allow them to be seen by others in a decided medium. There are many ways a character can be showcased to be viewed by others. Whether it is through the mind’s eye when reading about them, spectating an actor perform their role as them, or even seeing a creation of them in a drawn/made medium, the method of how a character can be shown has no bounds. Sadly even though I class myself as a multi-medium artist, I have found it difficult to get my own characters into this stage of the process. In my mind, they are all stuck in the previous stage as detailed, little statuettes waiting for their chance to move and help a story form around what they decide to do now that they can experience life on their own accord. The ultimate goal of this module is to teach me how to gain confidence in my skills as an artist to help push myself into allowing my character and stories to see the light of day, as it would be a tragedy to have such an incredible passion of mine to only be known and seen by a select few.
Therefore, now that I got my character creation process down to its bare essentials, I decided to look into all the creation elements I would use to bring characters to life, as well as experiment with different types of exercises and mediums to showcase a character while also allowing additional insight into how my brain interprets the world around me to create such characters and narratives.
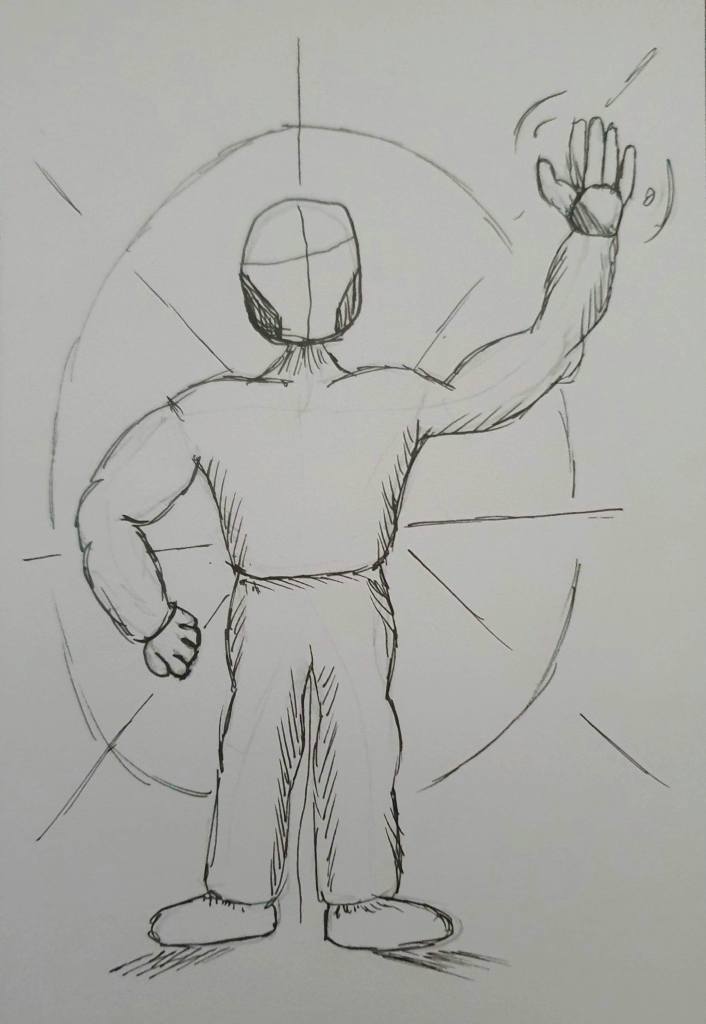
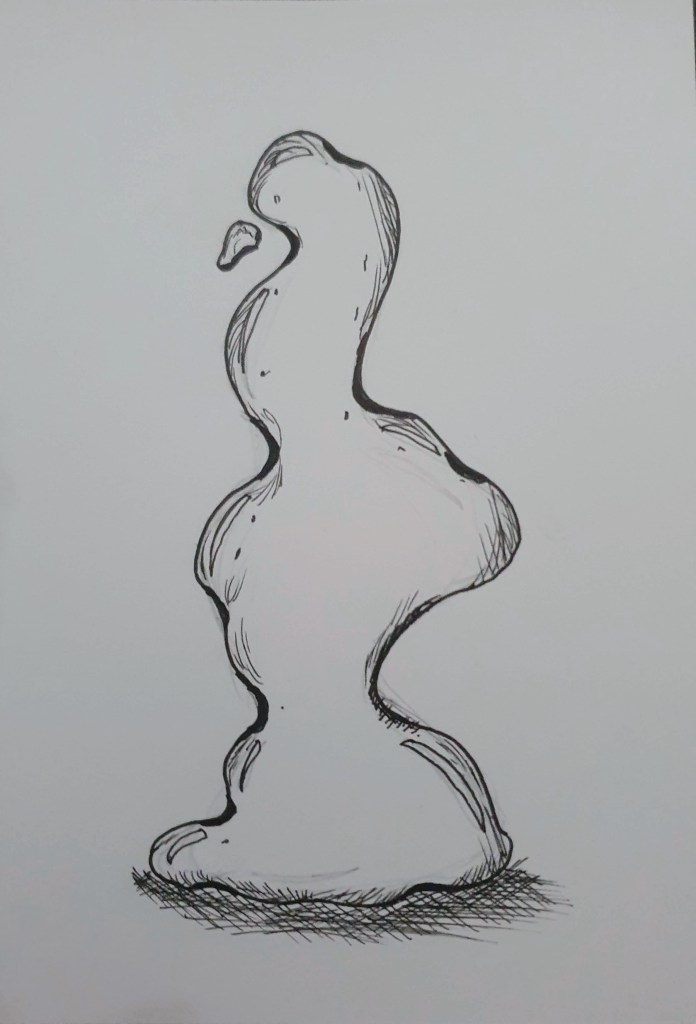
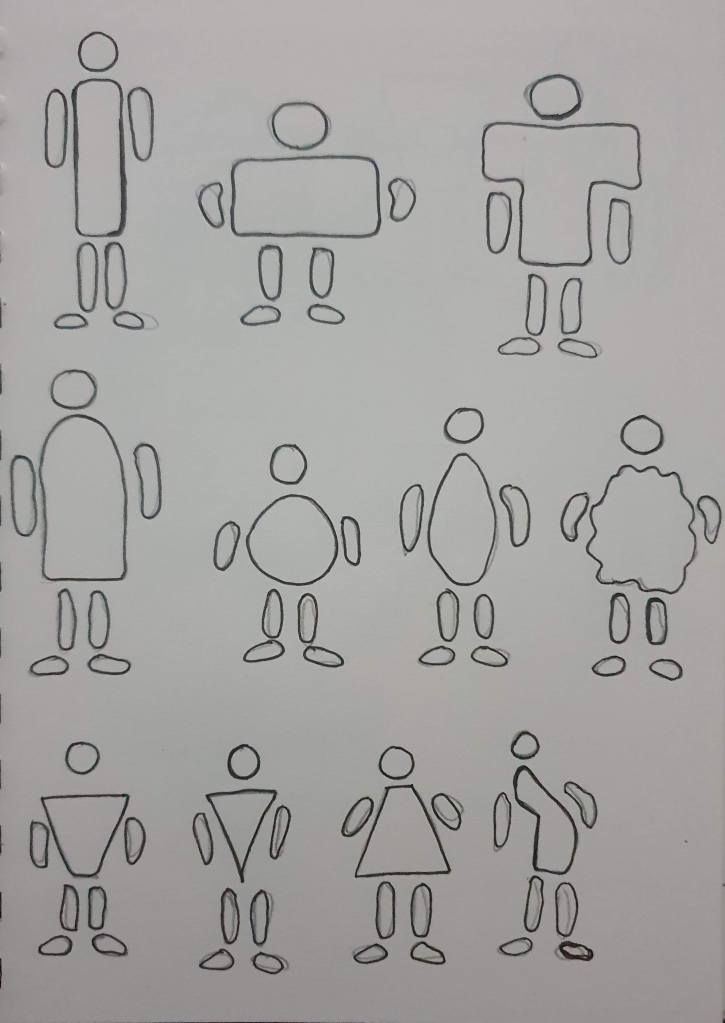
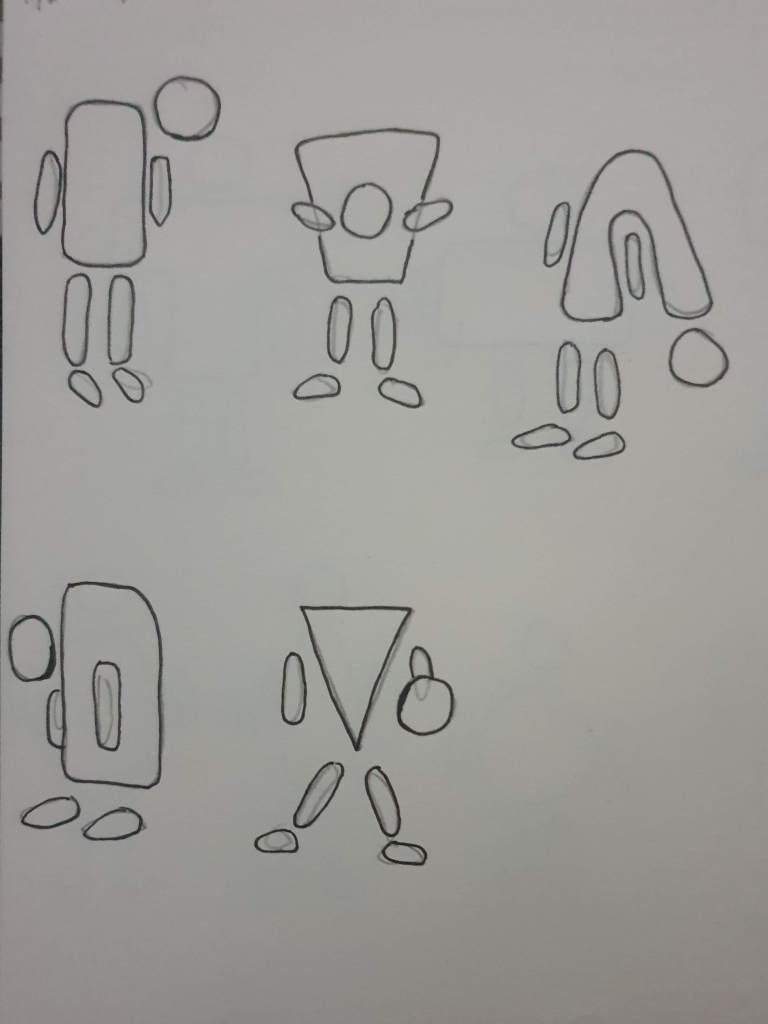
Experimentation with Drawing – Body Shape & Head Position Studies
I started my experimentation by reconsidering how I can draw absurd anatomy where the focus is on the weird shape and stature of the character rather than the accuracy of the proportions. As I tend to hyper-fixate on making sure details and measurements make sense, I wanted to try and pull myself away from that mindset and have fun exploring various types of shapes and positions instead. This led to a strange assortment of sketches showcasing how the base body shape of a character drawing can impact how general silhouette of the person. Unfortunately, after a certain amount of shapes I kind of hit a dead end on this study but had a lot of fun just mismatching sizes as well as finding new places for the head to interact with the body itself. This allowed me to have a little fun exploring the aspects of drawing monsters and ghosts where the head placement on the body can be irrelevant to where the body is but make complete sense within the context of the character form. For example, if the character is a headless creature but still needs to see, they can always carry their head in their hands or find interesting ways to attach it to themselves without the need to place it back where it originally resided.
Experimentation with Drawing – Drawing from People Watching
As I have hypersensitive senses, I find it overwhelming to be out in the world if I don’t have something to focus on. Usually, this involves headphones and loud music to keep my brain occupied while I’m walking from place to place, but if I need to listen out for my name to be called or instructions to be given then I tend to find myself people-watching to pass the time. I have always found it interesting that living in a big city, you are constantly surrounded by a sea of people with each individual person living out their own individual story. However, it has come to my attention that these stories tend to be very mediocre and bog standard within the realm of normality (e.g. heading to their 9-5, waiting for the bus or just simply picking up some milk and cheese). They are not at all what I imagine to be when my mind spirals and puts random pieces together to create an absurdly strange narrative for these passersby that I pluck from the crowd whenever I’m idle.
Since these narratives are usually spur-the-moment streams of consciousness-styled works, they tend to leave my mind and are forgotten to time as soon as I’m back on my way and doing what I usually do. Therefore in an attempt to latch onto these stories, I started up a little journal in my notes app so that I could just quickly chicken scratch random notes that would enter my head when people watching and remember these bizarre stories I would incorporate with the notable strangers I come across. The notes are as follows;
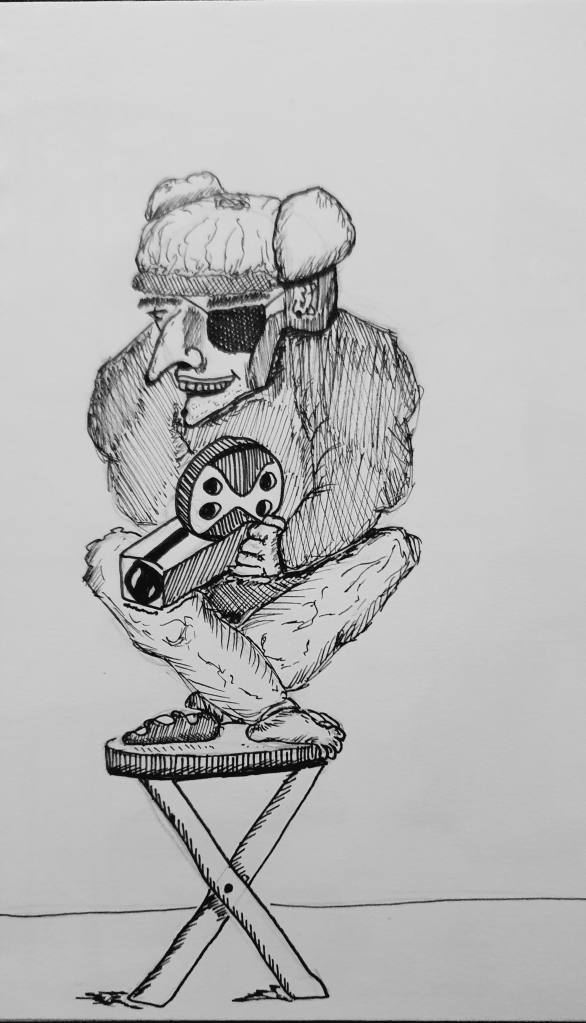
- Dishevelled Crazy Guy in one of those flapped ushanka hats – Crazed homeless director who wears bread for shoes.
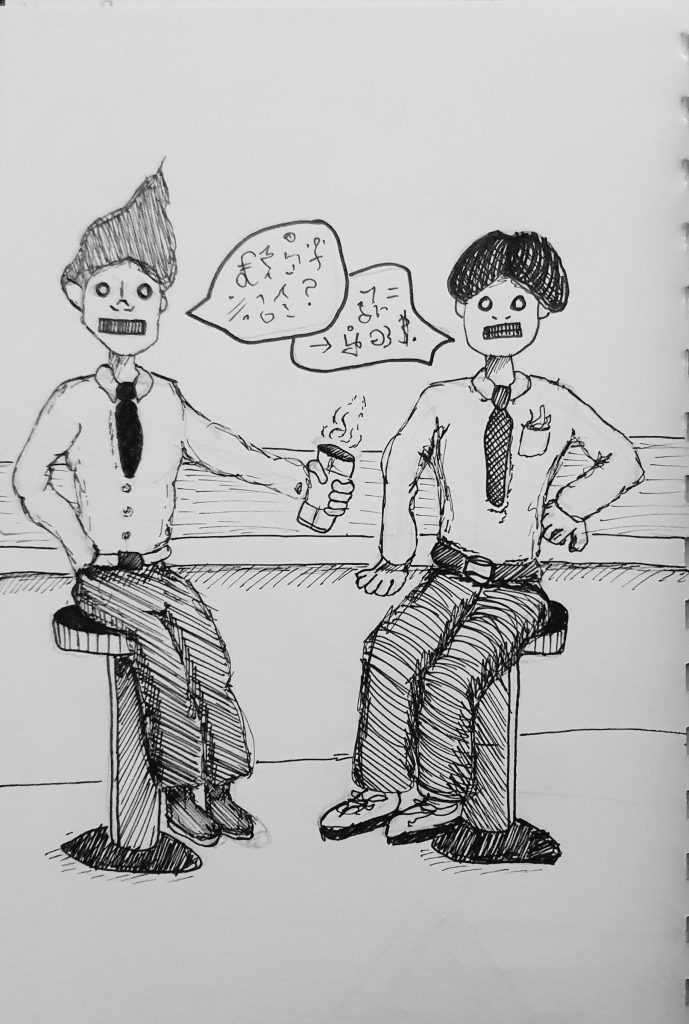
- 2 Finance Bros speaking Gibberish in a Queue – 2 Robots speaking robot at a bar.
- A Fast food Worker stealing from the drinks machine – A Fast food worker slowly becomes more and more evil as they continue to steal with growing sizes of containers.
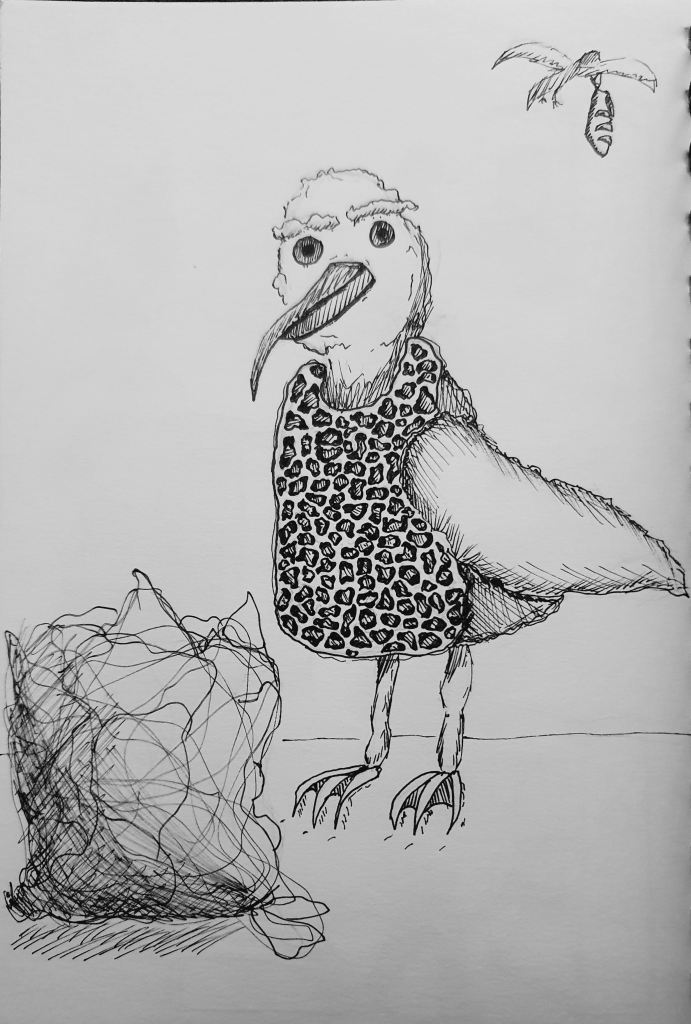
- Seagull stealing large clumps of paper – Strongman Seagull attempting to lift their biggest weight yet
- The Squeaky Woman – Wears shiny plastics to the point where she squeaks with step.
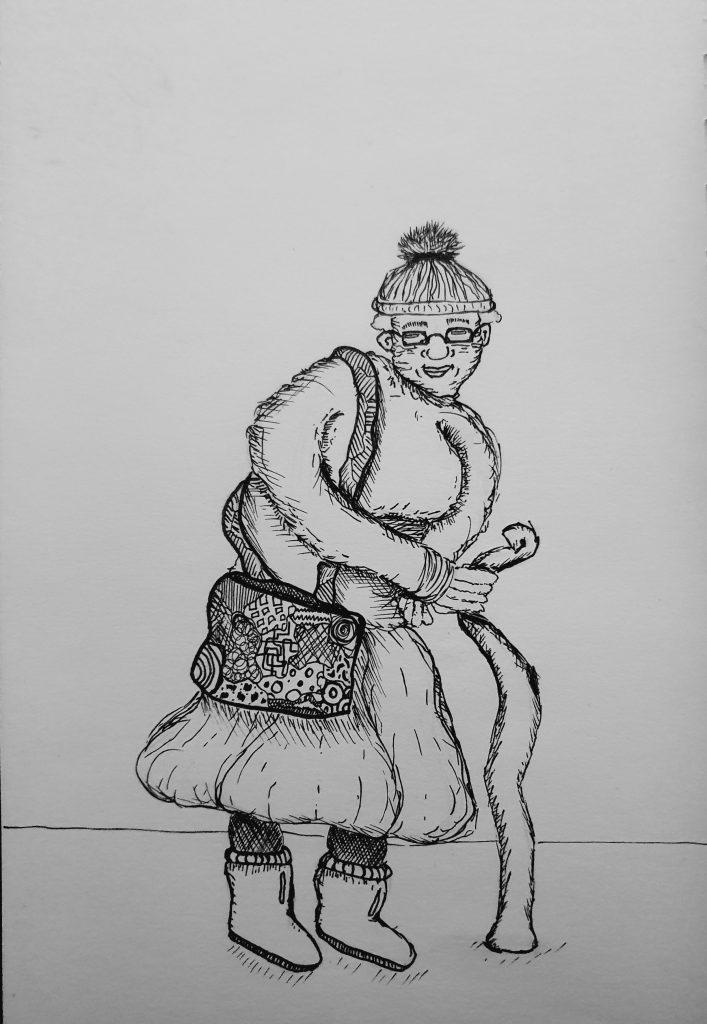
- Mystic Gran – Old woman wearing baggy clothes and a patchwork bag, holding a withered cane and a bright red nose from the cold.
- Blue Sleeved Lads – Group of 7 – 10 guys all wearing vibrant blue shirts
- The Huffer – Exaggerated grumpy look to the point that when he huffs, his toupee lifts
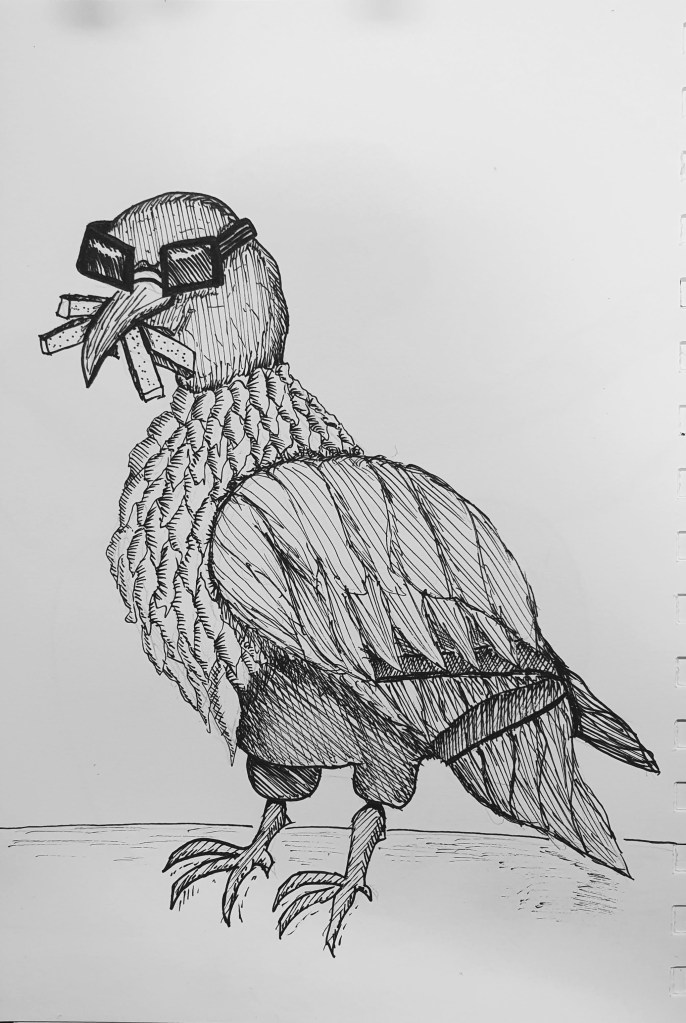
- Gangsta Pigeon – Roguish Bird who prances through and steals what they want, not giving a damn about who sees.
I used this exercise as a way to experiment with drawing characters from some aspect of realism rather than just drawing from ideas that pop into my head. Even though the characterised forms of the strangers were from my mind, I still tried to incorporate their own features and styles from what I could remember them wearing. I had a lot of fun with this practice to the point where I will continue to pick out notable people I see on my journeys in the future and illustrate them with these strange stories that I scribble down. A full gallery of the characters I drew from this exercise as well as future characters created from this process can be found here:

Experimentation with Drawing – Drawing from Non-Existent People
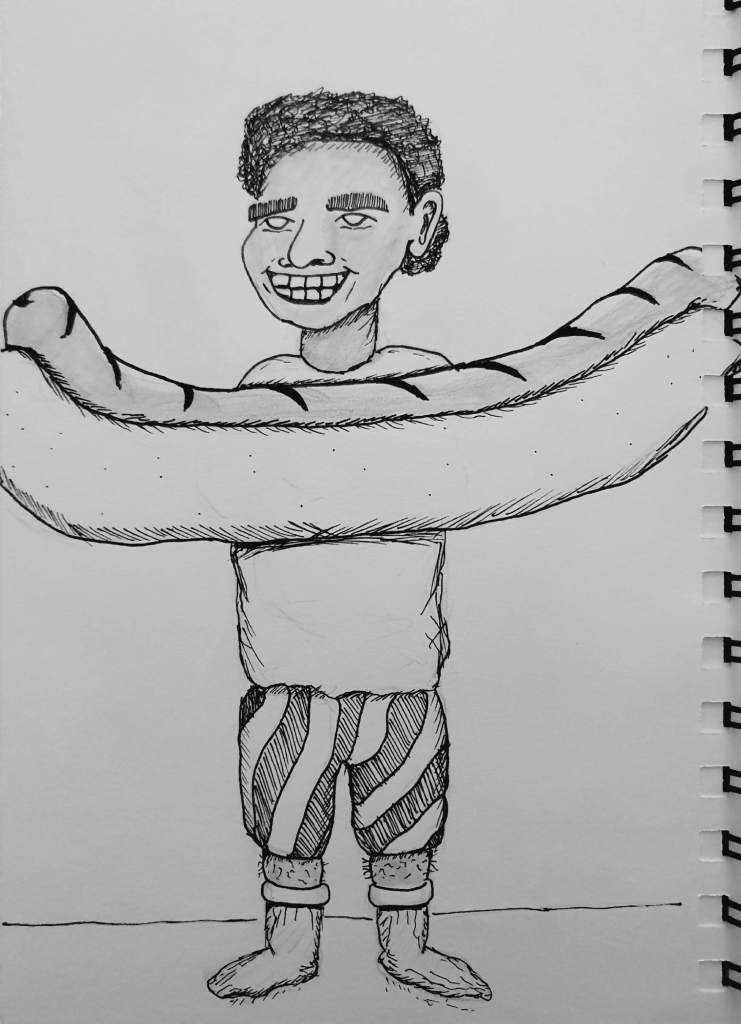
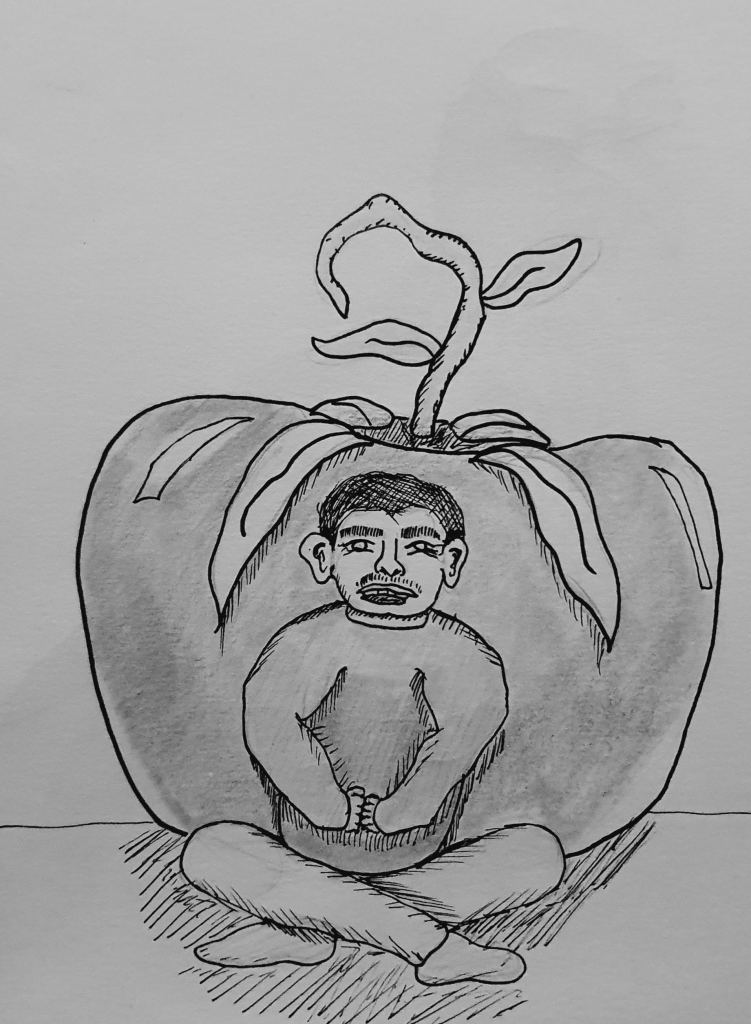
Rather than just having drawing practice coming from randomers I encountered in the real world, I thought it would be fun to try and add bizarre narratives to people that didn’t exist. To complete this process, I used a Random Face Generator (found here), where they created an artificially generated picture of a person. Using this generator, I looked through a selection of fake people and picked out a notable few to attempt to create a narrative for. The tricky part of this process was that due to the limits of the generator, I could only see the fake people in a profile format meaning the only aspects I had to work with were the head, shoulders and background elements of the picture. However, I did not let this little hiccup stop my brain from coming up with the strangest ways of interpreting the images, choosing to just illustrate the initial ideas that would pop into my head when looking at the fake person. The interpretations I came up with are as follows, from left to right;
The Blind Dragon Tamer – After a tragic accident involving dragons caused her to lose her sight, rather than wanting to destroy the beasts she chose to study them in hopes of finding a way to restore what she lost. However, she developed a strong bond with the species and dedicated her life to the wellness and protection of dragonkind. (Note: This character is blind due to many attempts of me trying to draw her eyes failing as they would keep getting more and more cross-eyed. Obscuring her eyes with a bandage and making it a part of a tragic backstory seemed like the most obvious solution to this predicament.)
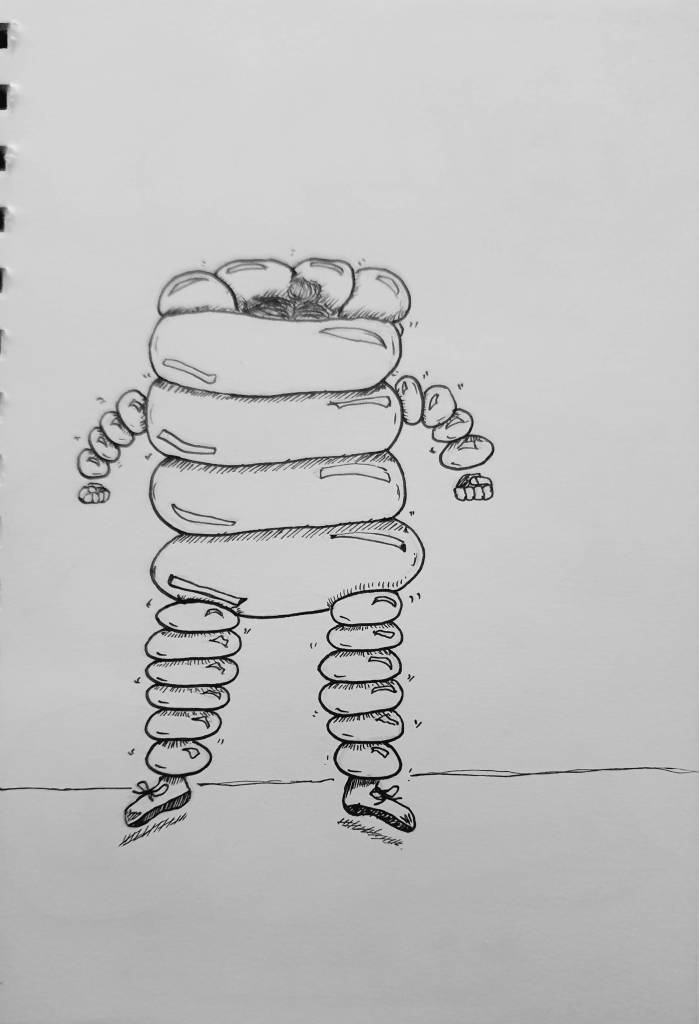
The Shit-Eating Designer – In an attempt to stand out at their freshmen year Halloween party in college, Dave decided to make a costume that defied expectations and would revolutionise the costume industry. With a shit-eating grin on his stupid face, he rocked up to the party in his Hot Dog Costume thinking he was the best for coming up with the new way to wear a Hot Dog. In actuality, he was regarded as the “try hard” of the party and didn’t receive any helping hands when he couldn’t go to the bathroom as his arms were unusable when wearing this costume.
The Pesky Stowaway – A retired gardener is pleased with the plentiful harvest of vegetables they have grown this season, but they were unaware of the uninvited guests that have laid claim to what wasn’t theirs. With the ability to hide and camouflage with their surroundings, these pesky pixies hide amongst the veg until they are brought inside the abode so that they can wreak havoc and chaos upon this old, tired fellow.
I have incorporated these drawings with the others I drew from my people-watching experimentation, mainly because these sorts of stories stemmed from similar practices of gathering what I could and filling in the gaps with absurd elements. I will use the portfolio talked about previously to showcase these types of characters if I attempt to use this practice again, although I will say I prefer drawing from people-watching as I have a lot more to work with.

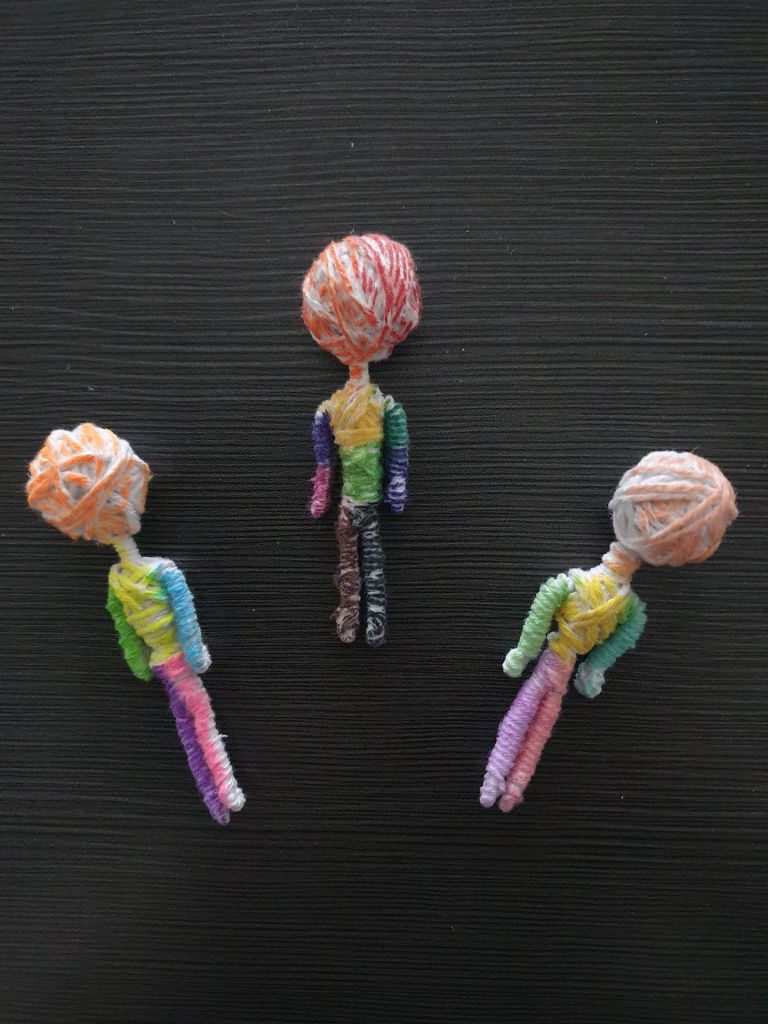
Experimentation with Making – Working with Polymer Clay
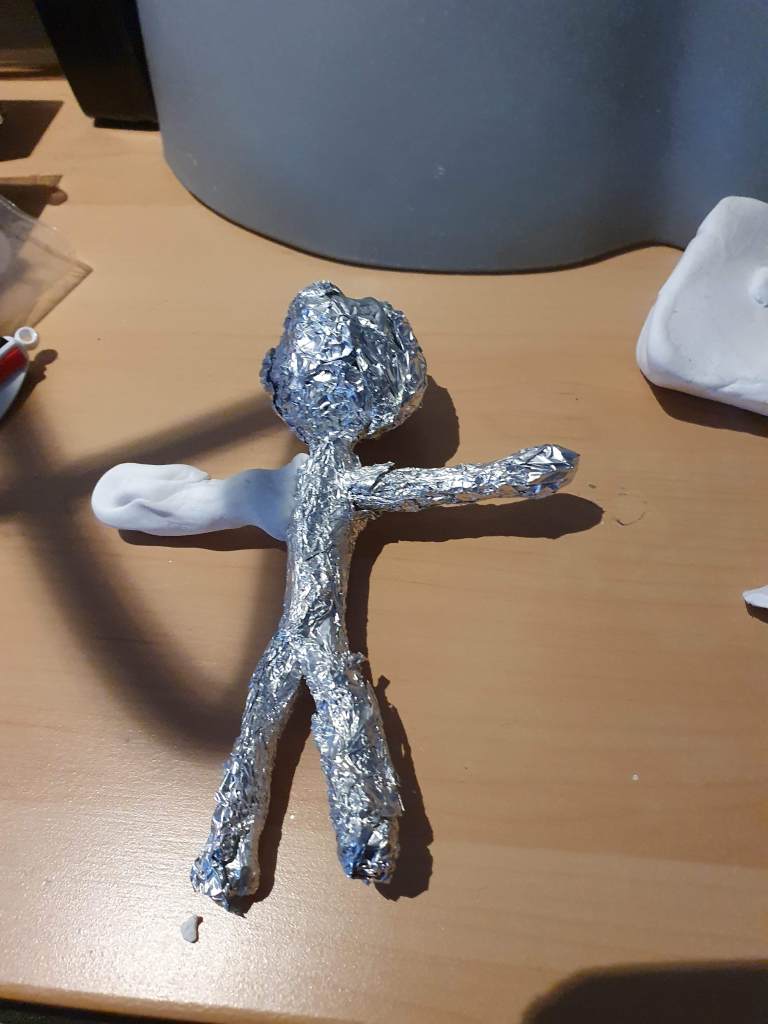
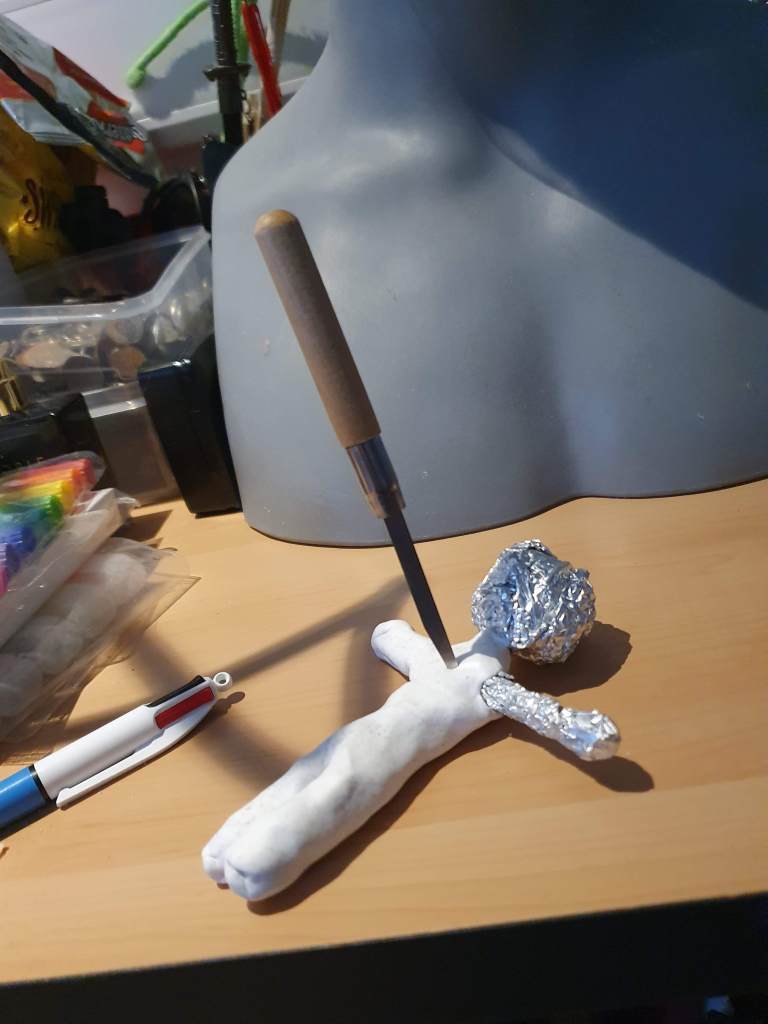
After creating some studies through drawing, I wanted to follow the same sort of line with making. Since my main focus of study before taking a master’s degree was Craft, I have had a lot of experience with working with various materials and processes which I why I chose not to focus too much on 3D processes as a way to break away from my usual format of experimentation. However since this project has a primary focus on narrative and character creation, I knew that if I were going to use making as a process, Steves had to be a part of it. The concept of a Steve is something I created within my foundation year originating from my passion for people watching, where since I didn’t know the person’s name I would give them a nickname which consisted of an adjective + Steve. These Steves have made countless appearances in many projects of mine, either shown as themselves exploring the world or used as a showcase of abstract concepts such as Emotions or Personality Traits. Since I didn’t want to fall back onto making as a crutch and wanted to explore new ways of making, I thought it would be a fun idea to explore the material of Polymer clay through the practice of making a Steve.
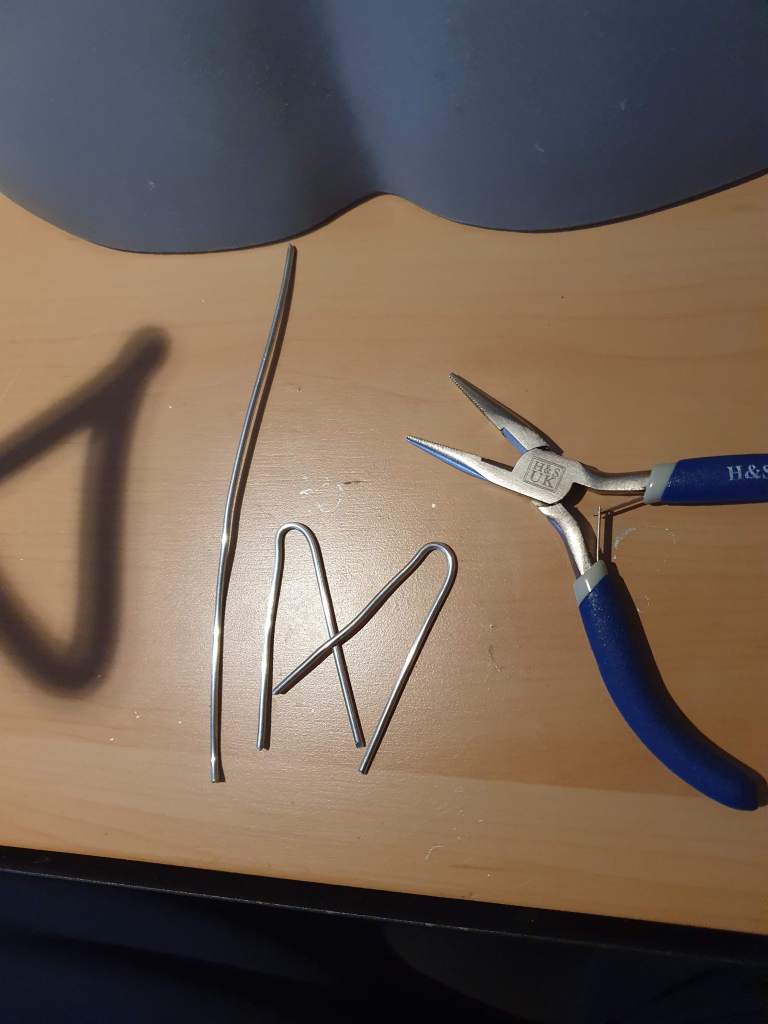
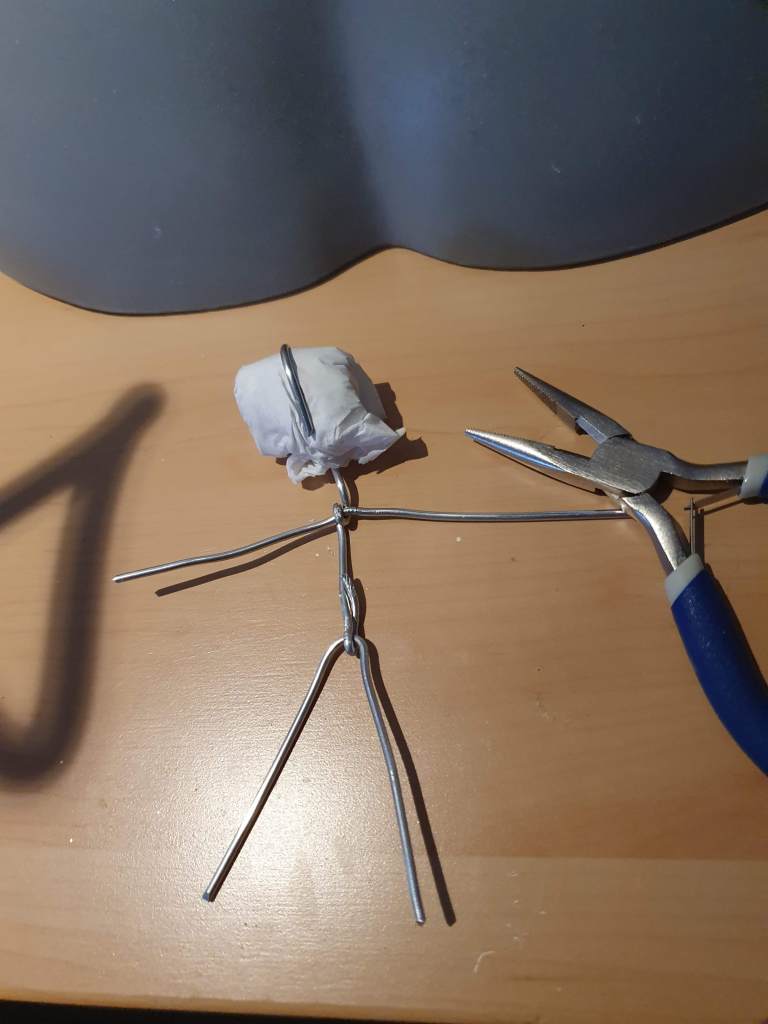
To start this process, I typically create a skeleton out of wire that consists of a long length for the spine and two curved pieces to be used as the arms and legs. Once the wire has been coiled together and the joints have been compressed with pliers, I find something soft and malleable to use for the base of the skull. Typically I used bubble wrap but at this stage of the project I didn’t really have any in supply so I did some quick thinking and used a napkin. At this point in the practice, I usually wrap the little person in string over and over until I have a full body but since I was working with clay, I thought it would be the best idea to wrap the body in tin foil and then proceed to layer on the polymer clay until the whole body was covered. Once the whole body had a layer of clay, I would have used tools to carve details into the material to try and create a string-like texture as a homage to the original styling of a Steve.
However, halfway through the application of the polymer clay, I was beginning to feel a strong sense of discomfort through the texture of the clay. Due to my hypersensitivity, I tend to have a lot of negative reactions to certain materials which can lead to either silent shutdowns or moments of rage. Upon reflection, I can’t exactly remember the events that occurred when experimenting with polymer clay, but as the pictures dictate I must’ve had a lot of anger towards the material to the point where I took a blade to my poor creation. Needless to say, I don’t think I will be using polymer clay again, especially since I can already easily handle regular clay and would instantly prefer using that over this.
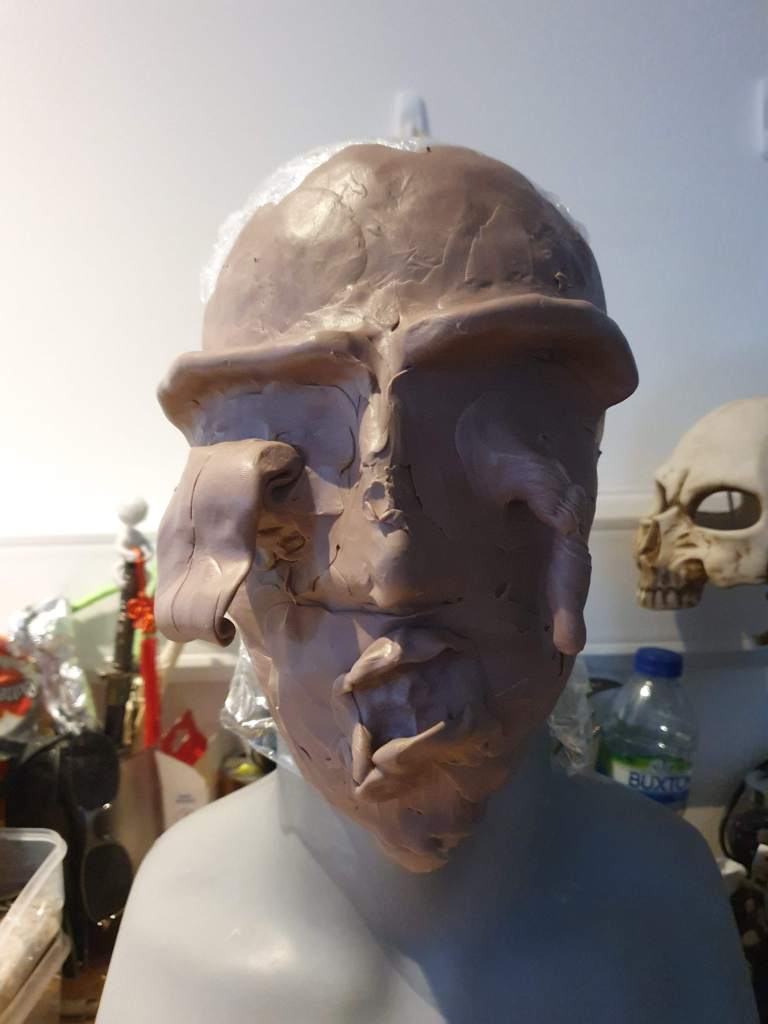
Experimentation with Making – Experimenting with Monster Clay
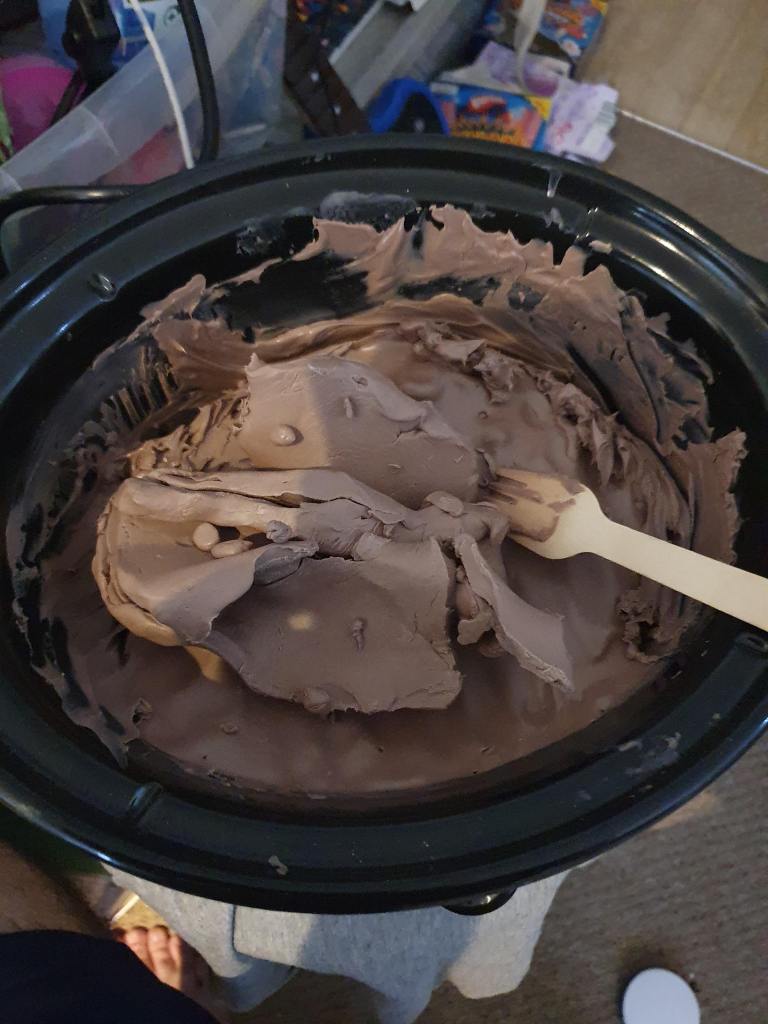
A few years ago while we were still in the dark ages of the pandemic, I thought a fun project/hyperfixation to start would be to look into the creation of masks and how they can be used in my work. Sadly all that came from that project was a big body of mask research that still needs refining and a giant bust to practice mask-making on (I call him Bald Brian for obvious reasons) since it was difficult to incorporate masks into the projects that were tasked to me but it was still a fun process to experiment with. Since then I tend to play around with Brian with a bunch of varying materials as a way of experimenting with crafting head/facial pieces of costume aside from masks. However one material was always a blast to create with and since I wanted to dive deep into characters and figure out ways to bring them to life in a 3D way, I thought it would be a good plan to experiment with Monster clay and see what kind of things come to mind.
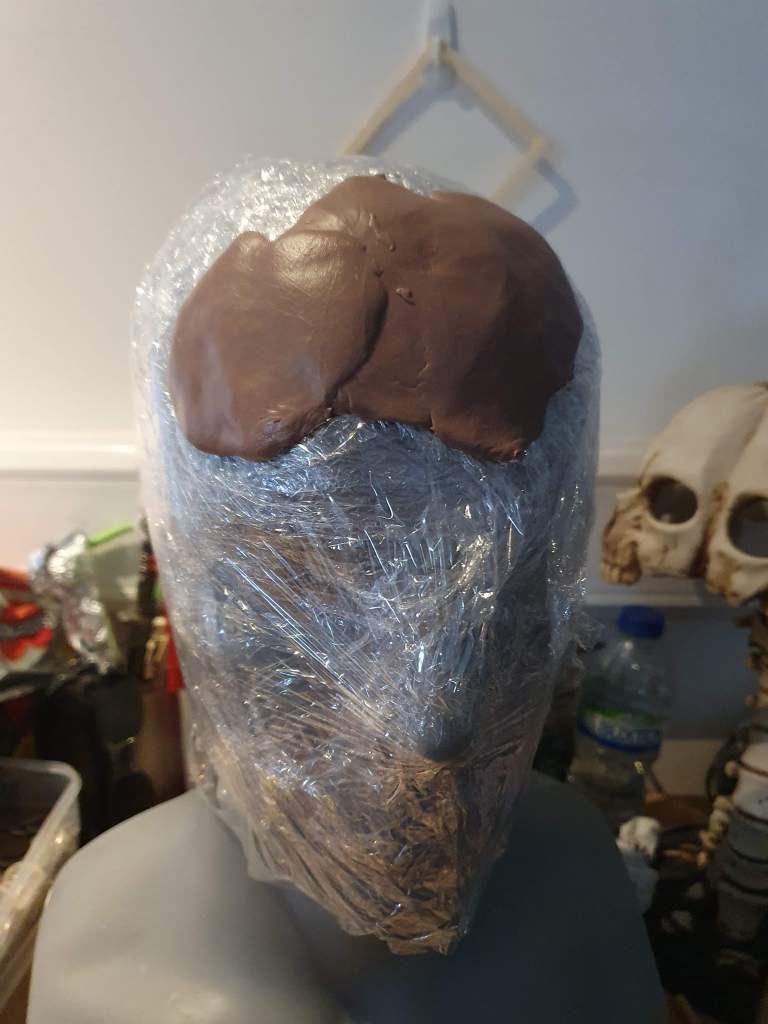
Typically with Monster clay, you create a base-level design that you hope to mass produce and then cast it in latex so that you can create a mould rather than having to recreate the same mask over and over with clay. However, from past experience, I hate using latex due to its over-empowering odour and slimy texture which is an attack on one sense too many for my tastes. Therefore when it comes to making with monster clay, I usually just have fun with it and make something which tends to stick around for a while before I get bored of looking at it and melt it back down again. Since this clay is malleable under heat, I store it in a crock pot so that it is easy to heat up when needed while also being self-contained in its own dish for storage. To start this process, I let the clay heat up and while I wait I spend some time wrapping up Brian in multiple layers of cling film so that the clay doesn’t stick to his skin (since it is a pain in the ass to clean off). Once Brain is mummified and the clay is liquified, I scoop up clumps with my hands and patch layers onto his face, slowly building up until the areas I need to be covered are built upon with a solid foundation of clay.
Now at this stage in the process, you start to add features and use tools to add detailing as needed, but since I struggle a bit with wanting to get things perfect I found a lot of difficulty when it came to making expressive eyes. The eyebrows I always love to make prominent and expressive, but the other features I kept scrapping and trying again over and over. It got to the point where I was blanking and becoming frustrated but rather than stabbing poor Brian like I did with the polymer clay creation, I just started adding random features to the face and began to create an amalgamated monstrosity. This involved spiralling a lump of clay into a crooked finger and curving out a long flat tongue to take the place of those pesky eyes I couldn’t make. As far as the mouth is concerned, I decided a melting expression was the best kind of look for a creature with appendages for eyes. This being is still unnamed, but if make a narrative concept in the future that has some antagonist who loves swapping body parts, I will definitely be coming back to this for inspiration.

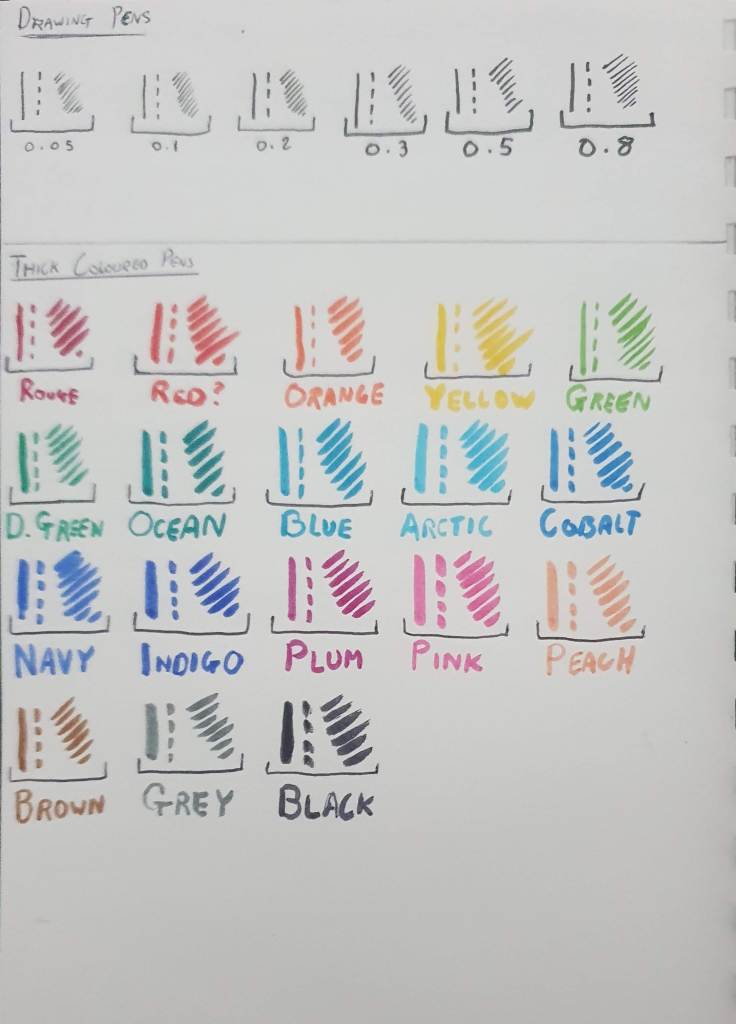
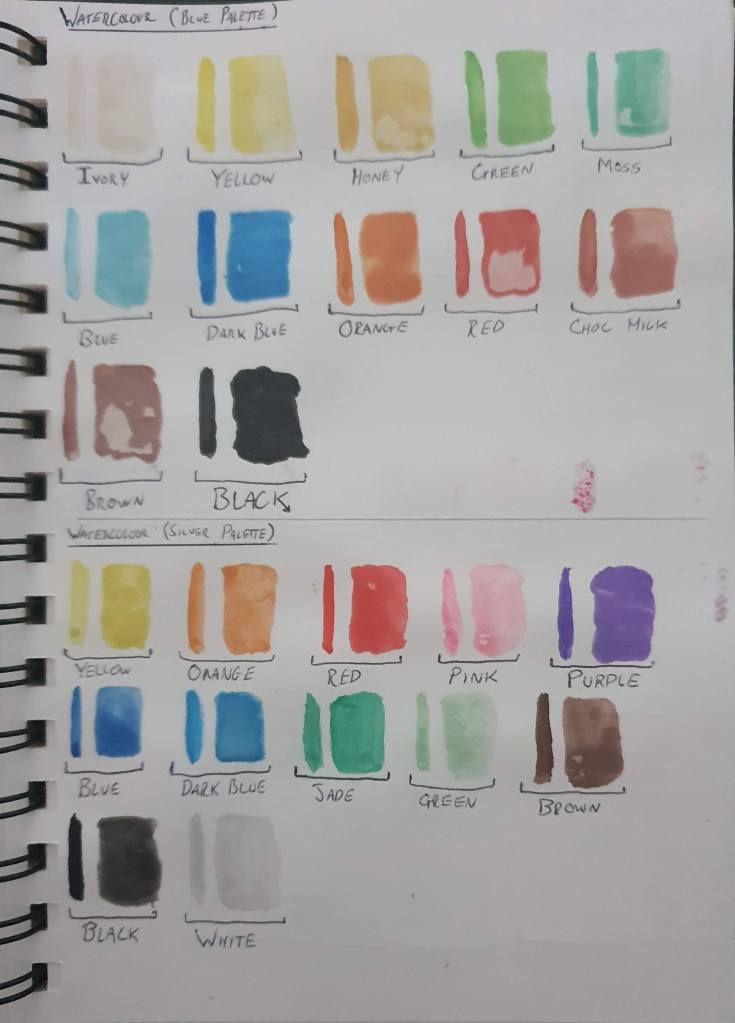
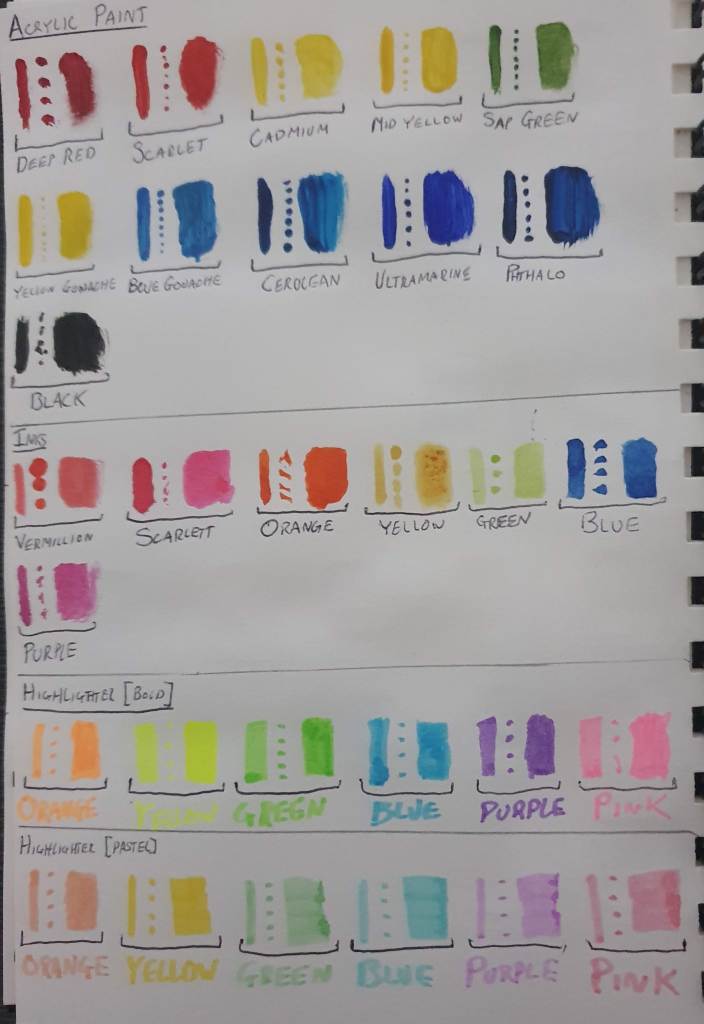
Experimentation with Making – Drawing Tool Colour Gallery
Through the years of creating art and making, I have become what is known as a ‘Magpie’ artist. This description fits artists who collected various types of tools, materials and junk in the hopes of using them in projects or forms of experimentation which quite frankly suits me quite well and I wear the title with pride. Over the years, I have collated a wide variety of drawing tools ranging from common instruments that I would use for everything to weird gimmick presents given to me by friends and family that I used once and never again. To help better my understanding of what tools I had at my disposal as well as what kind of colours/textures I could work with, I thought it would be a great idea to create a sample sheet for each of them showcasing all the varying elements of colour and patterns that they can create. My notes for each of the drawing tools are as follows:
- Drawing Pens – The tool I use for all of my illustrations as they allow for a wide range in nib thickness, to the point where I constantly have to reorder the same make whenever I run out.
- Thick Coloured Pens – Strange gimmick tools that are shaped like bricks so that they can be joined together. Honestly love the vibrancy the colours give off and are my favourite tools to use when adding colour to a piece.
- Thin Coloured Pens – Wide array of colours, but can leak through if the paper is too thin. Not ideal for taking notes but perfect on a sketchbook page.
- Watercolours – Jesus fucking Christ how many goddamn palettes do I have, they just keep coming out of nowhere. Still certain that I haven’t found all of them but I love the wide variety of colour tones and shades that each palette provides. Plus since I utterly despise Acrylics and Oils, these were common practice back in the days before Craft and would love to experiment with them more in the future.
- Acrylic Paint – Fun to experiment with in theory, however, if I was ever tasked to make an art piece with these I would rather consume them and die. Every time I paint with acrylics it always ends up looking like a 5-year-old’s art piece and that infuriates me beyond comprehension. The only use these have is to add colour to glues or to mix to make strange concoctions.
- Inks – Thought I had more of these but I think they must be collecting dust somewhere I cannot find. Nevertheless, the colours I had in supply still make a rainbow, however too much can leak through a sketchbook page so might have to go back to the drawing board to figure out where I can use these.
- Highlighter (Bold) – Has a strong colour vibrancy but is very difficult to draw with, probably better as an accenting tool to add little elements of colour.
- Highlighter (Pastel) – Love the softer colour tones but possesses the same drawing difficulties as the other highlighter type. Results suggest the same outcome in using these as an accenting tool
- Washable Marker – A fairly recent tool used for writing rather than sketching, has the potential for becoming a favourite due to their range in colour tone and doesn’t leak through the paper. Further tests are required.
- Alcohol Markers – The bane of my bloody existence. So many colours and ways to use them, but no paper I own can hold them without leaking through. Until I own the world’s thickest paper, these tools are a disgrace and will continue to collect dust.
After testing out all the different tools I had in my possession, I came to the conclusion that pens are my go-to and have been since the dawn of time. Since I have trouble with dexterity, it can be a pain in the ass to control a brush so not having to do that with a pen is a godsend as well as being able to achieve the same levels of colour with enough pens. However, through making these sample sheets, I have fallen back in love with using watercolours and plan on practising more with those in hopes of using them along with pens to create illustrations.
Experimentation with Making – Colour Tests on String
Once I had completed the sample sheets of all my drawing tools, I found that 3 sets had the same basic variations of colours but each had their own measures of vibrancy. Since I already had comparisons on what they looked like on paper, I thought it would be fun to test out to see how the colours would transfer when drawn onto some basic white string. To achieve this, I made a couple of Steves and coloured in sections until a profile was created that showcased each of the colours within the drawing tools set. As much fun as this was in practice, I decided that these tools would be fun if I wanted to illustrate a pattern onto string, but if I wanted to make full coloured pieces then I would just stick to other fibrous materials (e.g. Wool, Yarn, Pipe Cleaner e.t.c.)
Narrative Research – Character Roles & Qualities
When it came to the start of my research, I knew that there were two key aspects I wanted to look into. Those involved looking into the narrative structure and all of the elements surrounding that, as well as deep diving into the use of genre and how it can shape a story depending on the elements provided within the context of its subgenres. To kick off my narrative research, I thought it was best to look into the role of a character within a story and what archetypes exist that are most commonly used prominently. Since a lot of the character work I had done before this module was mainly focused on a singular perspective, I wanted to learn about the other roles that are present within a story as well as how those roles affect the overall plot.
After looking into all the various types of characters used within a narrative structure, I have learnt that if you want to create a solid foundation for a story you must have strong characters for the audience to hone in and latch onto and find relatable. It is commonly said that when people think back to stories they love, it is the characters that they remember first so when it comes to how I can implement characters within a narrative concept, I must first decide how best they can be utilised while also finding ways to add layers of depth and relatability to take more form and become real within the minds of the reader. With that in mind, I have come up with the plan of applying what I have learnt through this research to my character catalogue, assigning characters with an archetype(s) as well as sorting them by their assigned archetypes when it comes to illustrating them. That way I can have a customised character portfolio organised by their role within a story rather than a mess of random characters that have only been sorted by when their concept was originally conceived chronologically.

Narrative Research – Three-Act Structure
Now these next two sections are aspects of research that I learnt from attending the masterclass on Filmmaking and Storytelling. Since I already had a background in a lot of different processes, I didn’t sign up for many masterclasses due to already having tried the practices and not wanting to attempt them again for a whole plethora of reasons. Therefore I only really found myself drawn to this one masterclass due to the prospect of learning more about storytelling as I knew that narrative would be a core concept within my research. However, I found myself quite disappointed with this masterclass as from what I can recall it was 90% Filmmaking and 10% storytelling with that 10% being very minimal and not providing as much information as I would like. For example, here are the notes I gathered from the information that was given to us about the 3 act structure, which to my current understanding is the most commonly used structure for narratives;
3 Act Structure
Act 1 – Beginning
Setup – Backstory
Inciting Incident – The event or decision that begins a story’s problem
Rising Action
Act 2 – Middle
Plot Twist – A sudden change of events that sets up the finale
The action takes an Apex
Act 3 – End
Descending Action
Conclusion to Story
I will admit it is not at the fault of the lecturer this time since most of the time my disappointment with lectures/seminars comes from the lecturer themself but to my surprise, this one seemed to be knowledgeable in their field, but since this masterclass was more directed to film students who wanted to make films, it didn’t really provide much for a creative who was curious about writing/storytelling. Although I will say it did provide a fun insight into filmmaking techniques I didn’t know but sadly the notes I took on those techniques have no relevance to my research whatsoever. If I had to say something positive about this masterclass as a whole, I would say that it got me to look into these topics further on my own accord. Not out of intrigue for the subject, but mainly just to fill in the gaps that were created from the minimal information given.
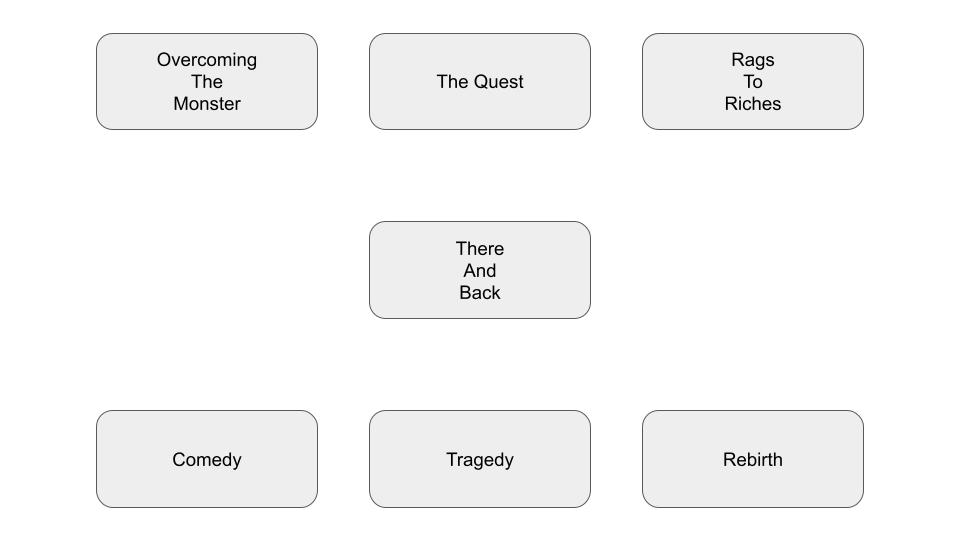
Narrative Research – “The Seven Great Narratives”
Another example of what was taught in the masterclass that had relevance to my research was titled “The 7 Great Narratives” which involved the lecturer giving a list of the plots with their respective definitions along with a few examples that best fit each plot. However, due to the alarming speed at which this man was whooshing through this topic, I found a lot of empty gaps in my notes for the aforementioned examples so with due diligence I went ahead and filled in the gaps myself after the fact.
However, upon researching more examples to fill the gaps, I found the original text that the lecturer was pulling this information from. It was from this discovery that I found that the “7 Great Narratives” are actually known as The Seven Basic Plots and originate from The Seven Basic Plots: Why We Tell Stories (2004) which is a book by Christopher Booker who goes into a psychological analysis of narrative and discusses plot by bringing it to its bare essentials. Booker also discusses subjects like The Meta-Plot and the Rule of Three within the book which were topics that weren’t even brought up in the masterclass but after reading through this book by Booker, I am surprised they didn’t show up since they are quite fascinating and allowed me added perspective on narrative.
Therefore what I have learnt from this is that when it comes to masterclasses, it is always beneficial to look more in-depth into the topics discussed even if you don’t feel satisfied by the information given. I found the notes and analysis of Booker to be far more insightful, in regards to my narrative research, than compared to the information provided by whoever conducted the lecture (the name of them still escapes me).
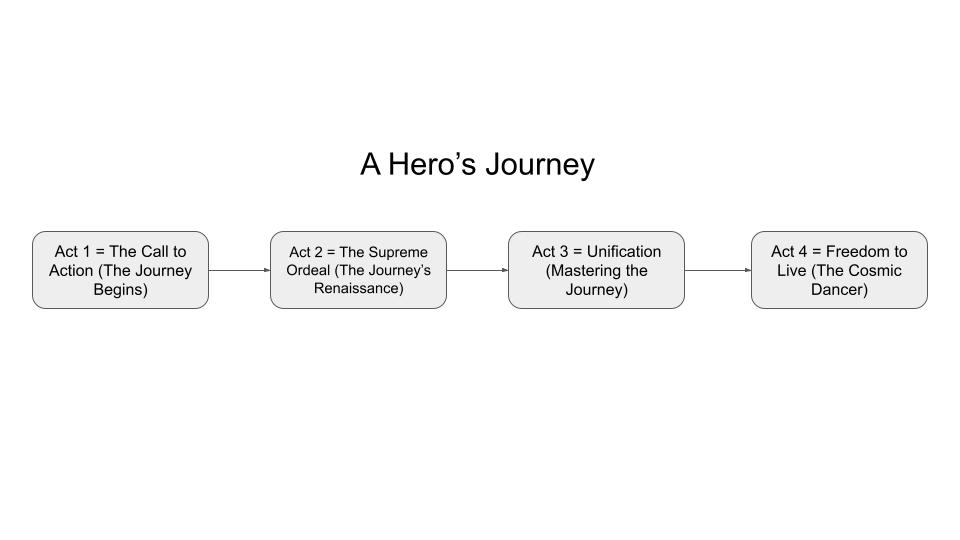
Narrative Research – A Hero’s Journey
Whilst conducting my research into narrative, I was reminded to look into the concept of the hero’s journey which is a commonly known story template that showcases the transformation of a hero as they embark on an adventure full of adversity. Upon looking into the topic I found that there are a lot of psychoanalysts who explore this narrative style, and its respective patterns, such as Otto Rank, and Fitzroy Raglan. However, I found that the term The Hero’s Journey was most popularised by Joseph Campbell who analyses the concept of a hero’s journey and uses it as a method of comparing religions in his book titled The Hero with a Thousand Faces (1949). Since I didn’t want religious perspectives to factor into my research, I looked into summaries of the hero’s journey to get a better understanding of what it is as a whole.
I found that when researching the topic of the hero’s journey, I was drawing a lot of similarities to Booker’s notes about the metaplot and how the main focus of the story embarks on this adventure to face trials of tribulation only to come out the other end transformed. Overall it was a great takeaway in figuring out the steps needed for a character to go through a transformative experience, although it was difficult to break out of the mindsets that the concept would pull me to. It was very hard not to automatically think of Adventure/Fantasy style stories when looking through these steps because I feel like there should be a base concept of this mythology that can be used for all aspects of narrative.
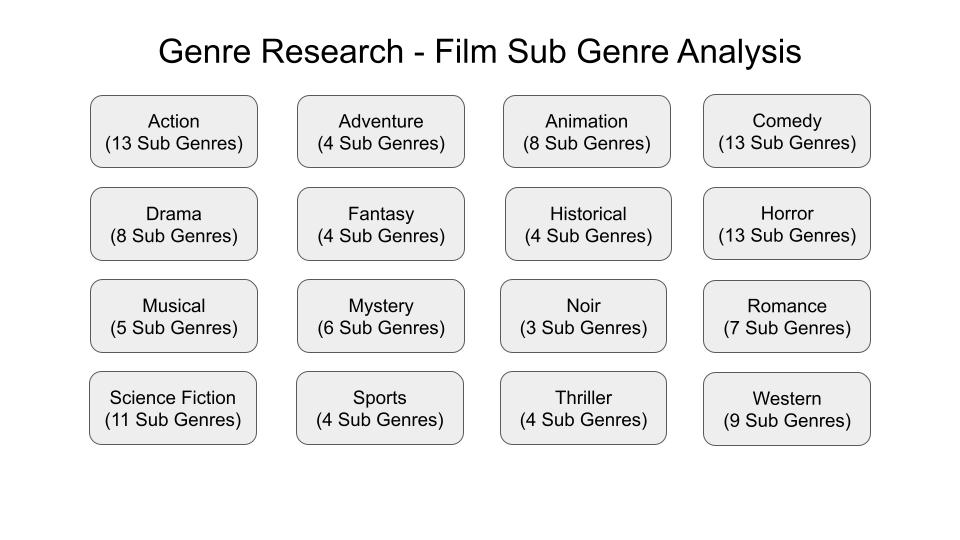
Genre Research – Film Sub Genre Analysis
At the start of this project, I knew that genre would play a big role in what I wanted to research, and that is mainly due to the fact I was intrigued by the vast spectrum before the module even began. I had plans to dip my toes into the sea of genre as a fun side project to learn more about what lies beneath the surface and how the influence of genre affects a piece across all types of mediums. So when the opportunity arose that I could guide my own research with no restrictions, I took that as the go-ahead to just dive head first into the vast ocean of genre and study all the different types I could get my grubby little mitts on. Before fully getting my head stuck into the research I did set myself some boundaries to what I should look into, mainly because I would be exploring a lot of avenues within this project and I didn’t want to confine myself to a singular subject. So with that in mind, I only looked at the genres of Film due to this medium being the primary source of narrative I absorb nowadays as well as being the medium with the lowest amount of subgenres. Overall, I will say this method of practice was an overwhelming success as it brought me a lot of joy, due to its repetitive nature, whilst also allowing me to learn more about the various aspects of what classes a film a certain genre. Through this research, I found that there is a lot of generalisation when it comes to the categorisation of film as well as a large neglect for subgenres mainly to allow for easier navigation when searching for specific media. Therefore with this newfound knowledge, I hope to further apply this research to my own narrative concepts so that I can diminish the neglect of subgenres in my own work while also creating a system that will help me develop stories across genres even if they derive from the same concept.
Since starting this research, I have been collating all of my notes into what I call a Genre Glossary to keep track of all of the genres I have looked into as well as any genres I wish to look into deeper if I make new discoveries. These notes include a brief description of the subgenre concerning the core genre that it stems from, as well as examples of the media that exist within the subgenre. I hope that once I have built a basis of examples across all genres, I will dive deeper into them and contrast notes on what makes each example unique and what details I can extract that are similar across a certain genre to help better my own understanding on what a work within a genre can accomplish.
Genre Research – Film Poster Analysis
As an art student, it is my understanding that when it comes to research it is always crucial to look at the works of other artists to inspire your ways of thinking. However, as an autistic person, it is incredibly difficult to be inspired by the work of others when you have a brain that will never shut up. In light of this problem, I also came upon the conundrum that my huge body of research at this point was just a boring black-and-white document and I didn’t really have anything visually stimulating, which if you study a creative subject then you’ve got to have some form of visual research. That is when I had the eureka moment of combining the two problems together to come up with a solution that creates a body of research that is both visually satisfying and inspirational. Since my genre research was already filled with examples of film, I thought it would be fun to assemble all the posters into one place and sort them by their corresponding genre, creating a repetitive style flip book showcasing the styles and techniques used to help represent a film. However, after building that body of research, I found that it was tremendously tricky to show in one place which led to me creating a form of collage of the posters (as seen below).
The image below is only a ⅓ of all the posters I actually looked at, but since you can only fit so many pictures in one place, this was the best sort of outcome. It was a new repetitive practice for me to assemble these images in this delicately ordered manner, which of course brought me as much joy and catharsis as the actual genre research itself. I chose this collage of posters in particular due to the strange curve that amasses within the middle which happens spontaneously and always surprises me whenever I see it. This method of showcasing posters is a process I will definitely continue to refine, especially since it has already become a common practice within a particular research application project I will discuss later on.

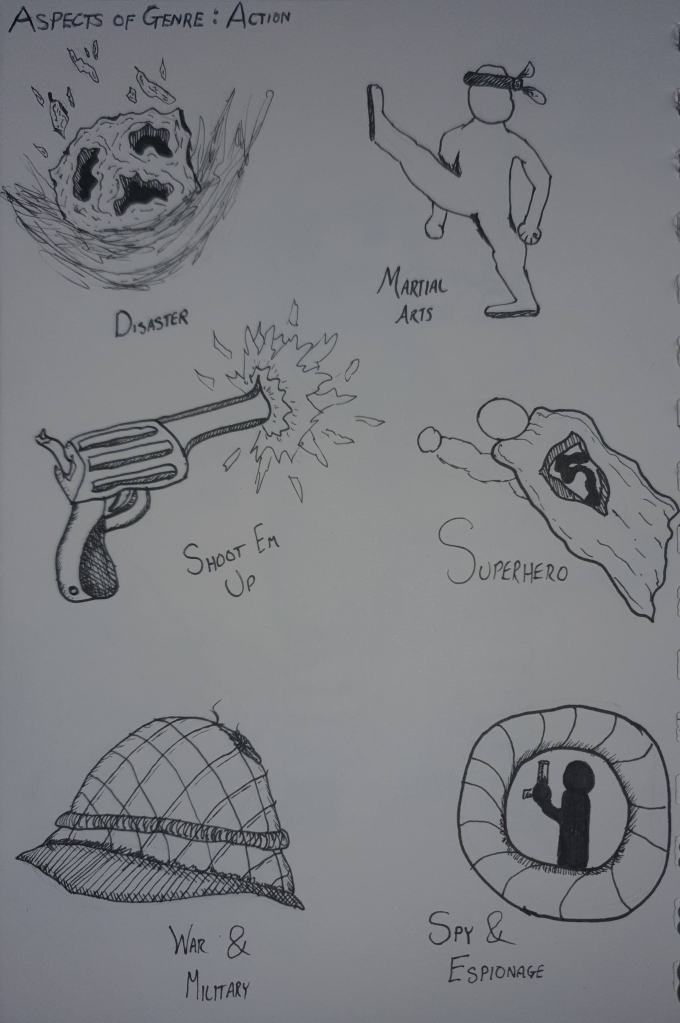
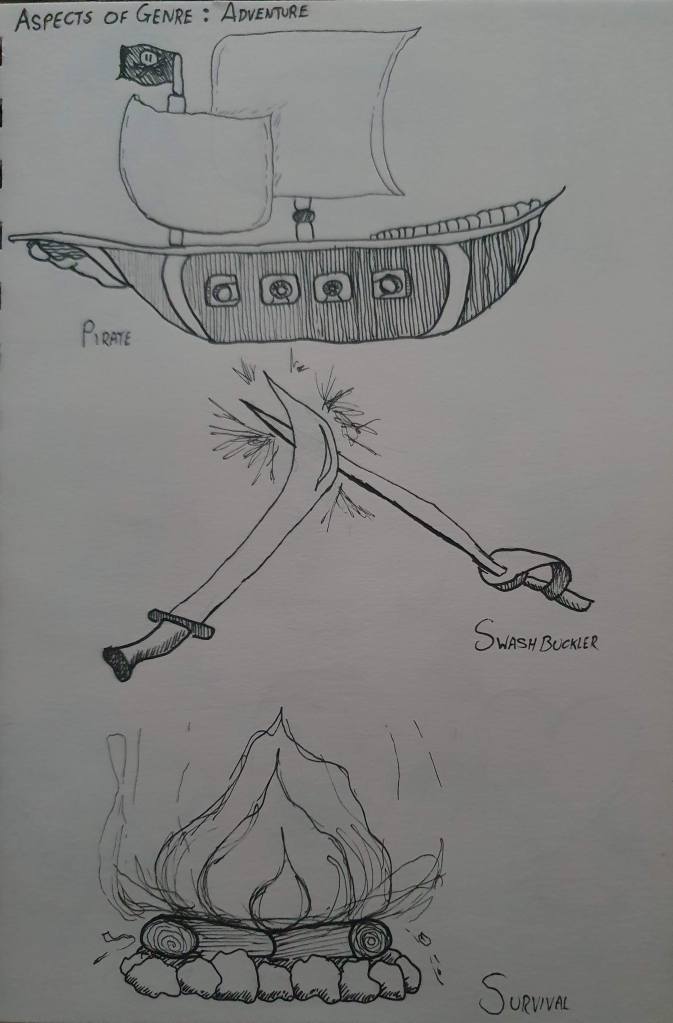
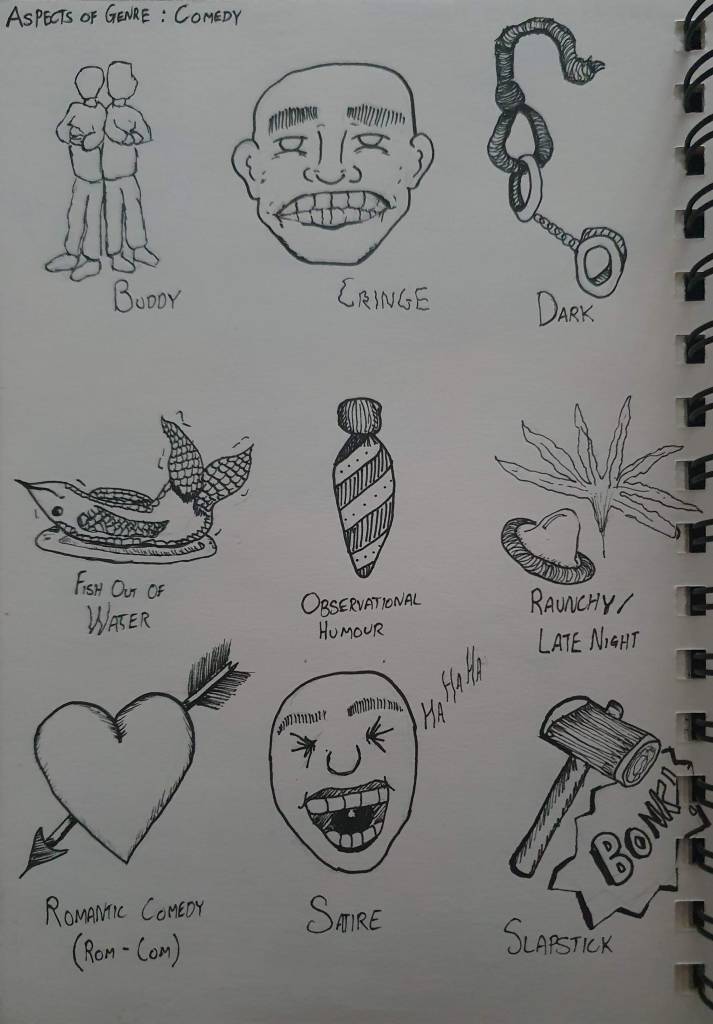
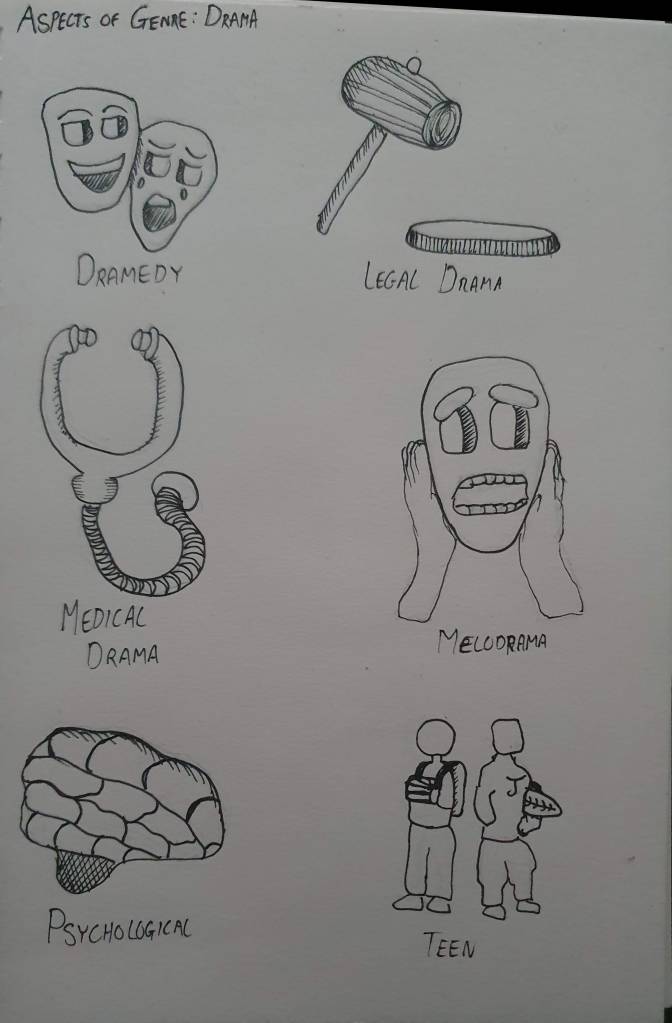
Genre Research – Pictograms of Genre Aspects
Before I had the eureka moment of building up a body of poster research, I thought it would be a fun idea to summarise subgenres into these little pictogram illustrations and create a gallery of genres similar to how I created a gallery of sample sheets for my drawing tools. However, through this process, I found it quite challenging to fit all the subgenres onto a page, which led to some aspects getting cut entirely. Since I didn’t want any of the subgenres to be left out, I decided to draw this experiment to a close and continue looking into other ways of showcasing genre. Although I will say it was fun to create these simple illustrations, and if I felt more desire to at the time I would have continued it on further. Maybe I will pick this process back up in the summer but only time will tell.
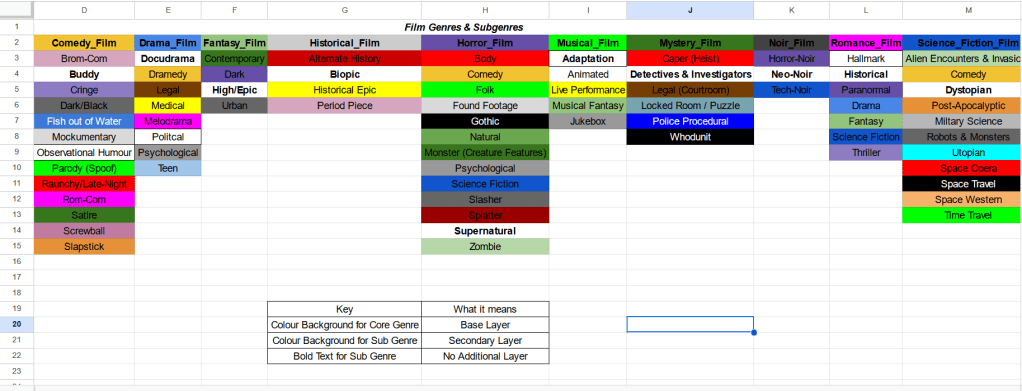
Genre Research – Colour Guide to Genre
For my dissertation, a lot of my research was centred around affect theory and how the perception of art can change depending on how the viewer is feeling. Through this methodology, I learnt a lot about the symbolism of colour and how it can relate to emotion to the point where I used the exact same colour analysis to create characterisations of Emotions themselves. I would then present these characterisations to focus groups each with an altered view of what the art was. One just had colour pictures of characters, another just had greyscaled images of the character while the other had colour images as well as individual narratives explaining who the character was. After conducting these case studies, I found that colour itself has a lot of signifying factors in representing what one feels and that can change depending on the person. For example, sadness is commonly associated with blue, however, if blue is someone’s favourite colour then they are less likely to associate that with sadness.
Therefore, when I decided to try and assign colours to genres I wanted them to be picked in the manner of how I feel when presented with the genre. That way it is a more personal guide to what each genre is whilst also providing insight into how my brain works and what colours mean to me as an individual. When it came to choosing what colour was best suited for what genre, I decided that the assignments would primarily be based on how they make me feel or what I feel best suits the genre in question. For example, in regards to how they make me feel I assigned Comedy to Yellow due to its symbolism of Joy and Horror to Purple due to its symbolism of Fear. Alternatively, in regards to what I felt best suited the genre, I chose colours that to me felt like they were closely associated with aspects within the subgenre. For example, Pirate would have a more golden shade to represent treasure and Splatter would have a dark shade of red to represent blood. I spent a lot of time dedicated to making sure certain shades matched up with what I felt along with making sure that hybrid genres shared the same tones as the core genres they came from, examples including Action hybrid genres being comprised of the main colour associated from the core genre it is merged with.
The creation of this colour guide came from a random spurt of inspiration when I started to backpedal back into my craft mindset, where I found the urge to start repetitive making and wanted to create some form of 3D art piece that incorporated my genre research. Using either the films that I looked into with my poster research or through gathered data from other projects, I had the idea of creating a large-scale net where each rung would be a film and would showcase the colours of its genre assignment. The rungs themselves would have a base layer consisting of their core genre while having a singular strand coiling around it to represent the subgenre. However, if the subgenre was the one I associated most with the core genre, no secondary layer would be applied (e.g. With action films, I first think of Shoot Em Ups therefore they are one and the same by association). If I do end up going with this plan, I would hope to use other fibrous materials when making the rungs depicting animated films so that those pieces can be more tactile due to animation being a more technical and visually stimulating process.
Genre Research Application – Cataloguing Film
When reminiscing at the end of last year, I was trying to remember all of the films I had seen that year but was finding it difficult to recount about 90% of them. For that reason alone, I wanted my New Year’s resolution to be dedicated to keeping track of what narratives I absorb throughout the year no matter the medium. So with that task in mind, I set myself some goals at the beginning of the year as well as a challenge to keep me on track to hitting my goals so that I will possess a stronger body of data by the end of the year. The goals for this project at the beginning were as follows;
- Challenge = To watch at least 1 film per day
- Goals include
- Minimum of 365 Films to fulfil the 1 film a day quota
- Film Total »→ 500
- T.V. »→ Finish at least 1 show a month to amount to 12 by the end of the year
- New/First Watches must consist within 50% of your data ∴ »→ 250
- Cinema Experienced Mediums must consist of 10% of your data ∴ »→ 50
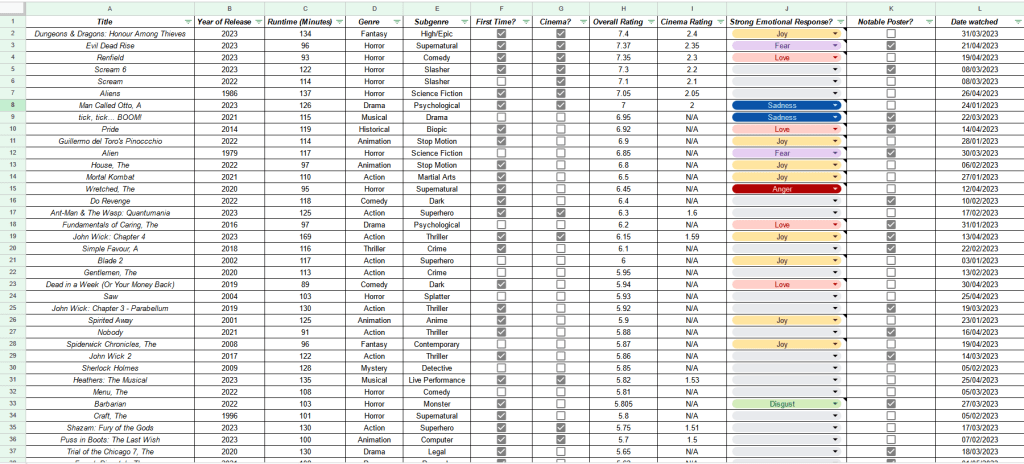
I wanted to use this year as a form of practice run for keeping track of narratives I observe daily so that in the future I can do the same for books. Since the majority of my library is in storage, I wasn’t able to include them within the goals set for this year but I hope to include them in future years as time goes on. This project was supposed to be just a fun side project I kept daily tabs on but since the beginning of this module, I have transformed it into a data analysis format that helps build my critical thinking as well as keep track of special criteria of data that I didn’t originally plan for. At the start of the year, the only data I was keeping track of were Titles, Years of Release, and Rankings as this challenge was originally formed to help keep track of things but also to help me stop watching films for pure enjoyment and actually offering my own opinion. After applying my research from this module, I have incorporated genre classification to help myself figure out what narratives fit which genres as well as take notes on which posters have unique identifying features that I would want to study further. These posters have also been collated into a collage-type format that I developed when producing a visual outcome for my initial genre research. In regards to affect theory and wanting to work more with emotion, I also kept track of which films evoked a Strong Emotional Response from me and which emotions were felt within those moments, keeping notes on the specifics of what made me feel that certain emotion.
As of writing these notes (April 2023), I have not missed a day in my streak and have watched a total of 193 different films this year so far, with more than 50% being experienced for the first time, which means I am well on target for meeting my goals by the end of the year. All of the statistics from this data as well as the emotional response notes can be found within a workbook that I submitted alongside this presentation, which will help break down the films into total watched within each genre set as well as total amounts of emotional response sorted by emotion.
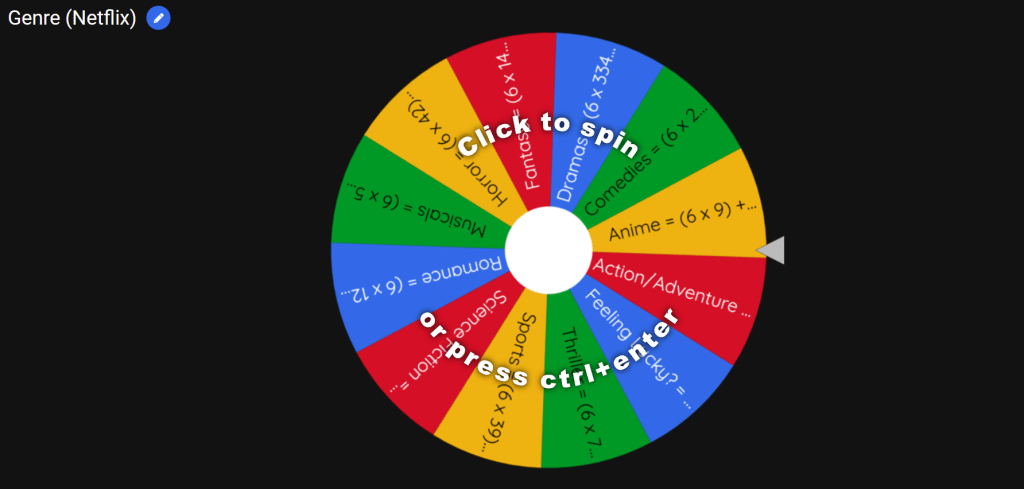
Genre Research Application – Film Randomiser Process
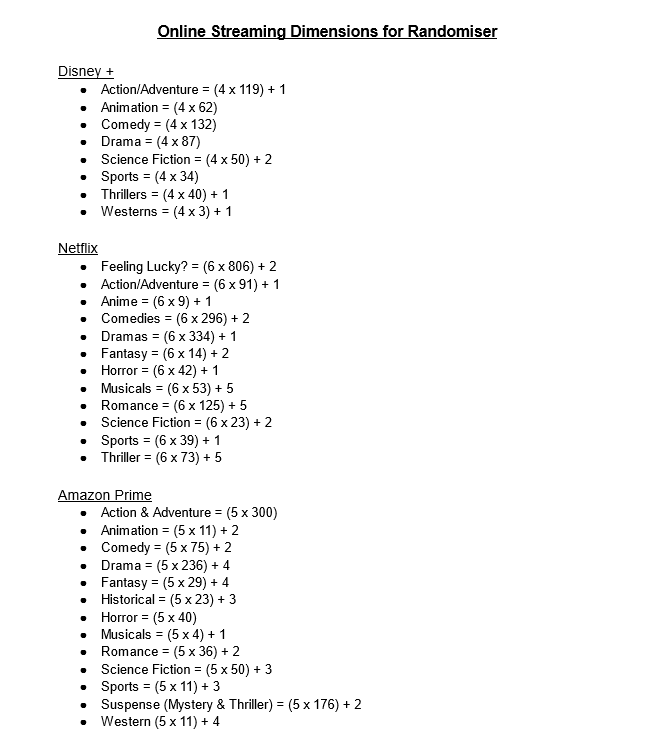
As a part of my data collection for cataloguing films, I found that statistics concerning genre tended to gravitate to certain ones while leaving others barren. I found that when in a slump of trying to figure out what to watch, I either choose something I haven’t seen in my preferred genres (Horror, Comedy and Drama) or rewatch something I find comforting or nostalgic. Since I knew the goals set for me were to comprise half of my data from new watches as well as desiring a more diverse body of research when it came to the genre, I tried to think of ways to help combat this issue and figure out new methods of decision. That is when I came up with the idea of leaving my choice up to chance and letting the decision of what to watch be chosen by a randomly dictated number, allowing me the freedom to not stress over what to choose as well as opening up the opportunity to observe narratives I had never had thought to watch. However, since I didn’t have a clue how many films I had access to whilst also wanting genre to play a massive factor in the decision process, I took it upon myself to collect data on how many films existed within each genre that were available on each of the streaming platforms that I use for entertainment
Now due to each of these streaming platforms having vastly different methods of genre classification, I stuck to the core ones that were present within my research to avoid later confusion down the line in the process. From there I went to each individual genre on each platform and counted the rows of films while also taking into account how many films existed on each row. After tallying up how many full rows existed, I made sure to note any films left over in the half-finished rows at the end of the selection and came up with this mathematical equation to solve for the total number of films in the genre. The equation is as follows;
Total # of Films = (# of Films in a row * # of Complete Rows) + # of Films remaining in Unfinished Row
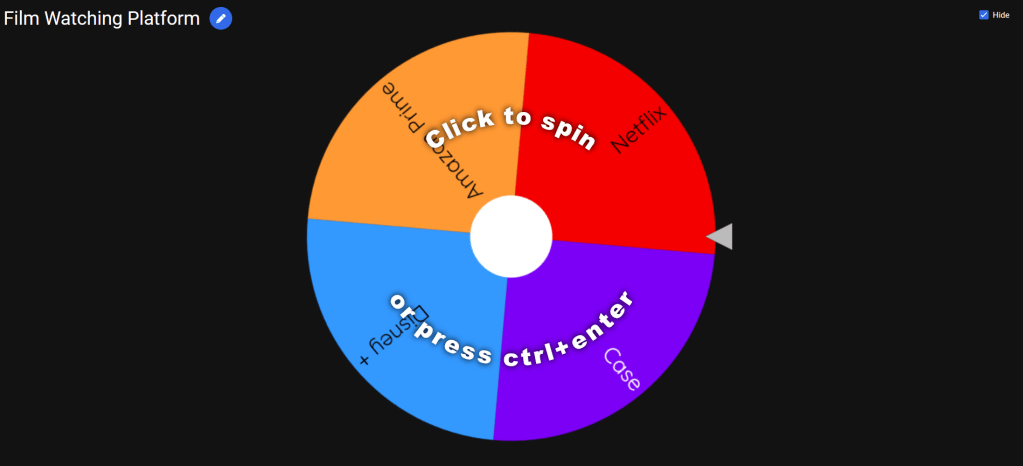
After gathering all of the data needed across all the platforms, I created a series of randomiser wheels that would decide upon a genre equation that I would use. The wheels consist of one to decide which platform to use and then 3 wheels for each of the platforms filled with the respective genres that they offer. Once I have been given an equation, I solve for the total number of films and feed that number into a Random Number Generator to choose a number between 1 and the total number provided by the equation. This randomly decided number will then lead me to my randomly assigned film and voila Bob’s your uncle, job’s done. Granted this process could be simplified a tad but since I have a love for maths and solving puzzles, I kept them in to add to the joy I have with this project. Plus I am the only one crazy enough to use this process anyway so it doesn’t really do much harm.
Since implementing this process into my project, I have reduced gravitation to preferred genres although it will take some time for other data points to catch up. However this process has been a success in showing me narratives I would never think to have seen as well as providing me with more subgenres to add to my initial genre research since before this process was created, the total number of film subgenres I was looking at was around 109 if I can recall correctly. With that in mind, it proves that there are subgenres that I overlooked in my initial deep dive which means that my research will evolve and be added to as time goes on, not only to account for missing genres but to also add subgenres that are yet to be created.
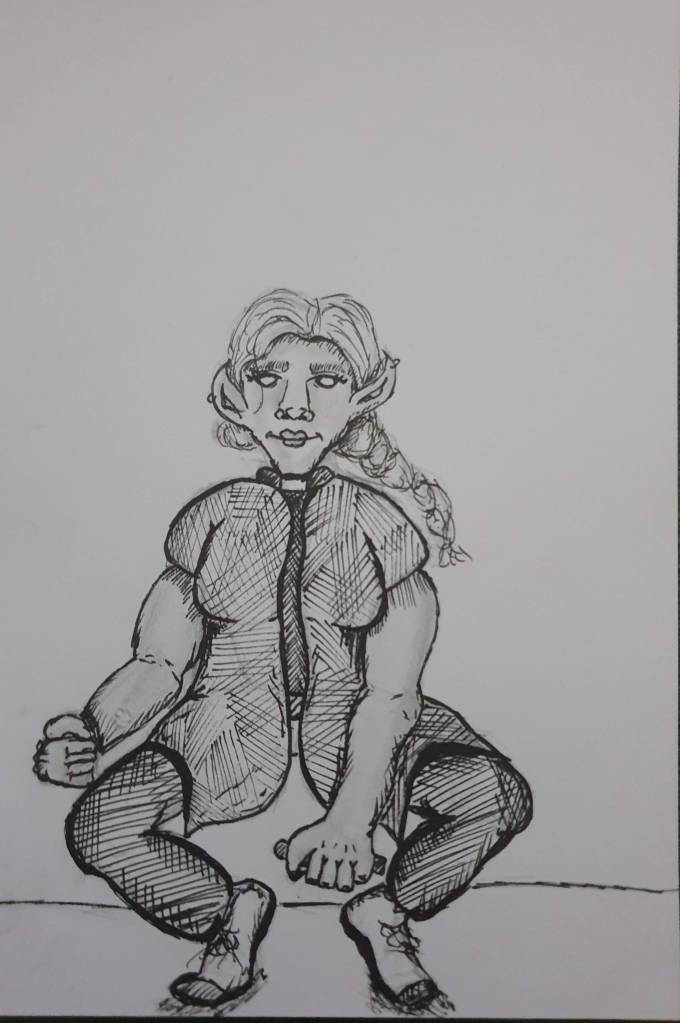
Genre Research Application – Assigning Characters to Genres
After exploring all the different avenues of experimentation and research that I have conducted in this module, I found that it was time to actually start the steps into taking characters from to catalogue to finally be designed. I had to get myself into the headspace that I would be drawing them in the style that I have been refining for a few years and that they would be different from how I perceive them in my mind but that is okay. For this project, I decided that rather than plucking characters out at random to practice on, I would instead assign characters to certain genres that suited them best. This would allow me to perceive their creations in this way as a form of characterisation of genre as well as using the characters themselves to showcase aspects of their respective genre in a fun way. At this point, I believe that over half of the subgenres I looked into have had either a character or narrative concept assigned to them for me to try and bring to life. However, due to the way my brain is wired, I can’t exactly pick my favourites to draw and I am forced to work my way down the list alphabetically (It is for this reason alone that people hate doing word searches with me.). Therefore the characters shown below are all from subgenres existing in the Action genre, their descriptions are as follows (from left to right)
- Action – Disaster: Constantine Rubytooth
- A gnomish adventurer who always looks out for the little guy, optimistic in every way but often gets turned around every 5 minutes.
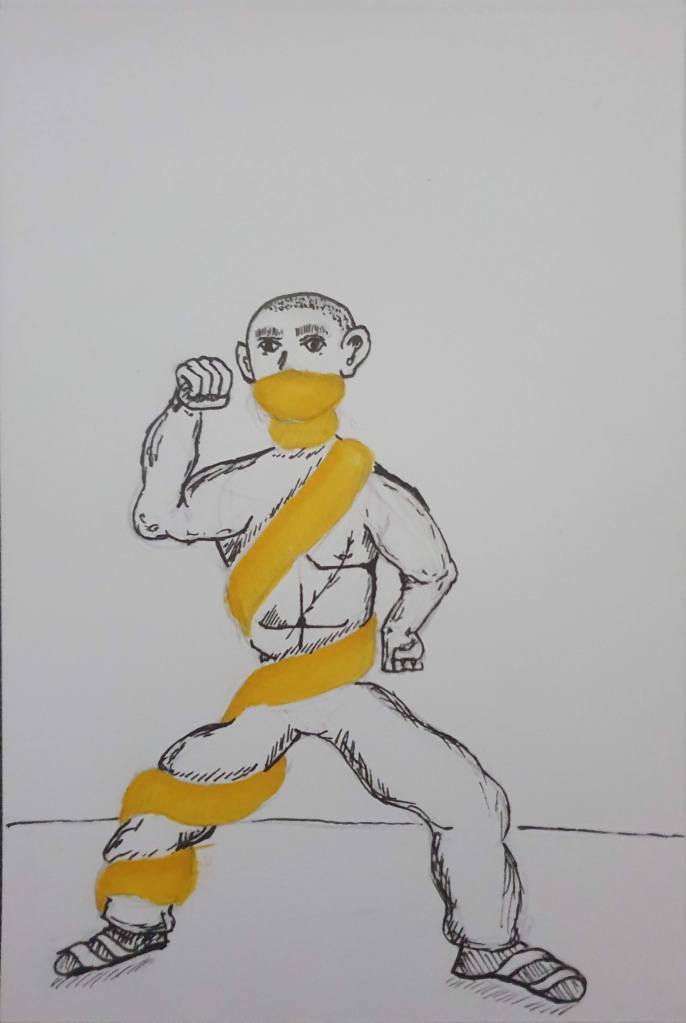
- Action – Martial Arts: Charlton Huang
- A kind-hearted martial artist who does whatever they can to help those in need, no matter the cost.
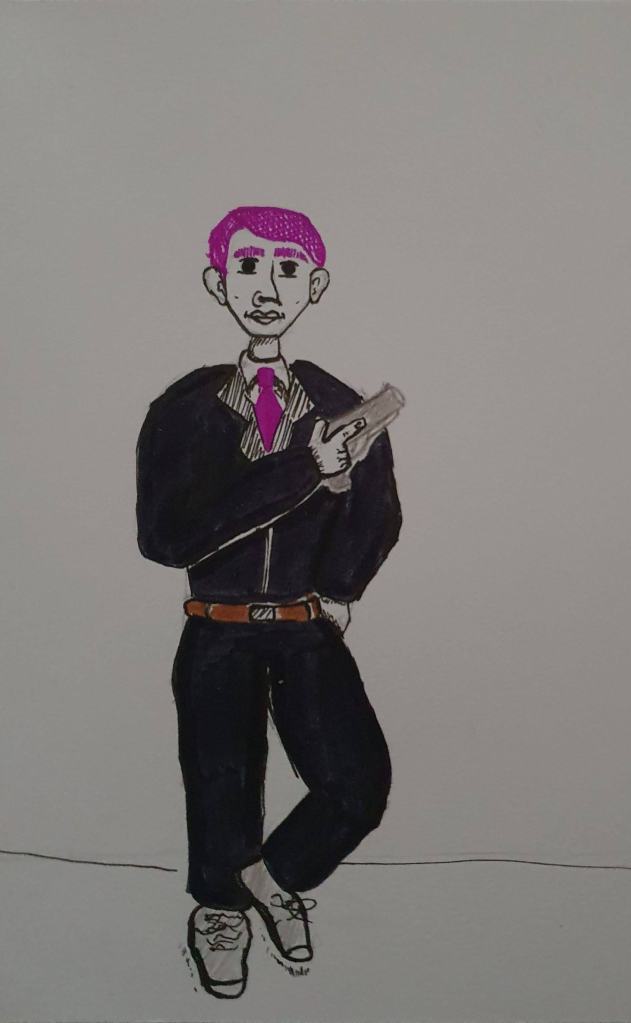
- Action – Spy & Espionage: Parley Haiz
- An agent born as a master of disguise, the perfect candidate to send deep undercover missions of intrigue and espionage.
With the characters I have drawn so far, I wanted to use each of them as their own drawing experiment to help myself build up confidence in using the drawing tools I explored earlier as well as training myself to involve colour in my drawn pieces again since it has been quite a long time since I last illustrated something in colour. Through this, I found that I am more confident with Black and White mediums and using different texturing techniques to showcase a character sketch than I am with sketches that are fully comprised of colour. At this point, I would say that I need to work on more colour-based drawings to build up my confidence and I shall definitely be re-sketching Parley due to my sheer disappointment in how the full-colour test turned out. However I will admit that I enjoyed using colour in a minimal way as a form of emphasis like I show in Charlton’s sketch, I will be exploring this technique further in future character sketches.
Next Steps of Research
After coming to the end of this project and thinking that beginning my journey of building up the courage to draw my characters would be the finale, I realised that I should probably go into detail about what I hope to explore in the break of time that we have between the end of this module and the beginning of the next. I found when creating this post that there were some gaps in what I wanted to look into and that I didn’t explore as much as I would have liked. So with that in mind, I have dedicated the final sections of this post to inform you of what I will be pursuing as well as what I hope to achieve with what I will be looking into.
Next Steps of Research – Identity
To start, I want to look more into Identity and how someone presents themselves. Over the years when it came to creating stories and characters, I found that it was an extremely easy thing for me to assert myself into any headspace of any character I created no matter their gender, sexuality or narrative archetype. This led me to figure out who I could possibly be and how I choose to identify myself, questioning aspects of my reality that I have known for decades and deciding what the best way to express myself would be. In the end, I decided that since I am already an autistic person who lives in a world not made for autistic people, I shouldn’t conform to this society’s gender normality and just live my life the way I want to live it. So I chose to not follow labels and be who I am, expressing myself in ways I feel comfortable in and I’m happier the more for it. It is because of this thought process that I went down that I want to dive deep into the 3 core aspects of identity listed below, as this will help me build my own character research as well as give me more tools and knowledge to help diversify my characters and allow for more ways for them to express themselves in their respective worlds.

Next Steps of Research – Stock Characters
As I was initially looking into the subject of character archetypes, I found myself drawn to the use of stock characters as a way to flesh out a story by adding in people who fall into a select category. Growing up as a fan of Horror, you see a lot of this happen within film and literature for a variety of reasons, ranging from filling a cast with lacklustre characters to adding more attention to the main antagonist, to flooding a story with non-memorable characters just to build up the body count for the inevitable slaughter. With that in mind, I wanted to look more into the topic of stock characters during this module as a way to build up a body of research that would help me learn what to steer away from when creating characters so that I can avoid creating lacklustre stereotypes when it comes to filling out a narrative. However, due to how expansive the list was as well as how offensive a lot of the stereotypes that existed within the realm of stock characters were, I decided that it would be too big of a diversion to look into during the time set for this module so I would have to begin conducting this research after it has concluded.

Next Steps of Research – Expanded Film Poster Analysis
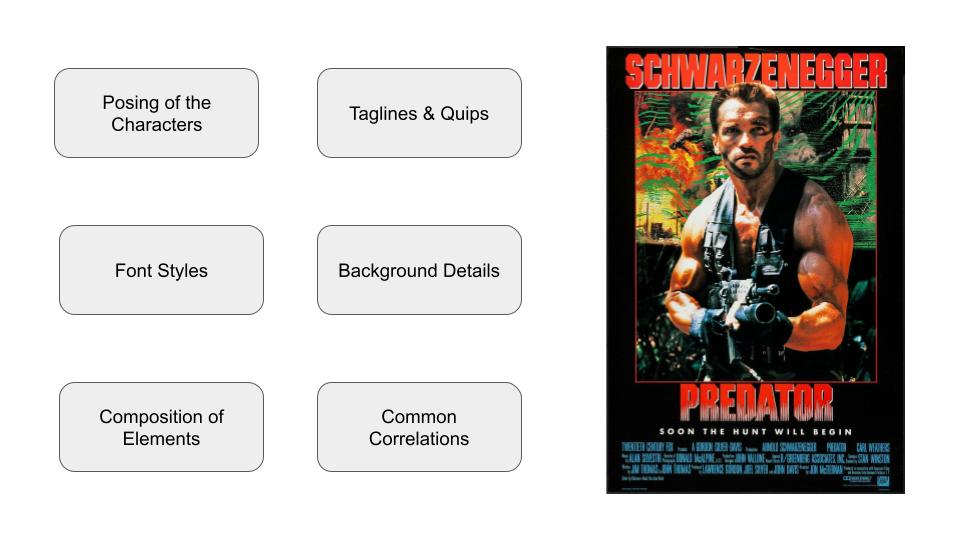
When it came to my initial poster research, my hopes were to provide notes on the posters themselves to help teach myself the ways of designing a poster specific to the type of genre that it exists within. The plan was to style my character illustrations in a movie poster-style showcase, using my characters as a way to show elements of the genre while also being in its respective style. The notes would have included a brief description of the subgenre, as well as the titles of films the posters came from, before going into detail about subjects such as;
Posing of the Characters – Looking at the way the character is positioned in contrast to the background elements of the poster, taking into account their relative size, pose and posture. (Example: Arnold positioned front and centre, posed like an army marine in battle with emphasis on his muscles)
Taglines & Quips – What taglines were used in the marketing of the film, were they vague and stereotypically of the genre or were they smart and unique to the film itself? (Example: Soon The Hunt Will Begin = Semi-vague for the subgenre but makes sense within the context of the film.)
Font Styles – What stylistic choices are used when showcasing the text in a poster, are their specific style choices depending on the chosen genre? (Example: Bold Red font = Perfect stylistic choice as impactful text draws people in and vibrant reds are a colour I identify with the Action genre.)
Background Details – What exists in the poster other than the characters, how can we utilise this best to give context for the story but without giving too much away? (Example: Jungle and Explosions with weird green lines = Story takes place during the Vietnam war, where Fire and Jungles are used in story retellings as prominent features. Green lines as a subtle nod to the Predator’s alien technology used within the film.)
Composition of Elements – How does everything within the poster fit together, is it ordered in any particular way or is it a chaotic ensemble of details and hidden imagery? (Example: Composition is in an ordered fashion utilising boxing as a way to make it seem like it is a window into the film itself. The composition vaguely reminds me of baseball cards where the character is centre stage in their element.)
Common Correlations – Across all examples used within the subgenre, what do the posters themselves have in common with one another? (Example: Predator shares similar styles of character posing as well as unique font choices with the other examples within the Action/Horror subgenre.)
Next Steps of Research – Expanded Genre Research & Application
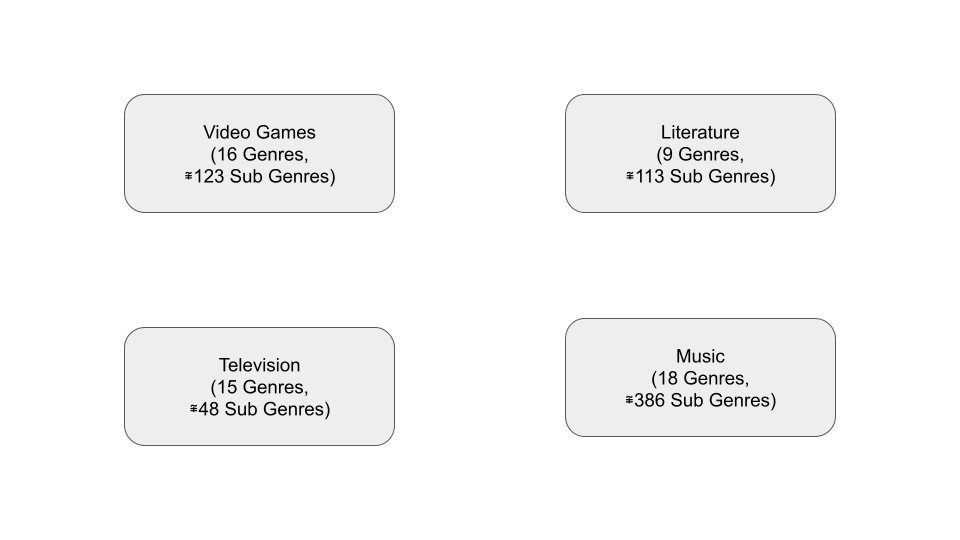
As I had mentioned before, when it came to my initial genre research the plan was to deep dive into genre as a whole across all mediums. However, I thought it was best to cap myself with film since it already has a key presence within my narrative research. The other reason why I chose to only look into the film genre specifically is that after collecting as much information as I could about genres in other mediums, it became clear that it would be too large of a research project to cover in such a small time frame. My interest in the genre is still persistent and definitely want to continue looking into the expansive realm of genre, to the point where I have already dabbled within the genres of video games and have used a process of application to another personal project of mine. This body of research is more likely to become something more along the lines of personal rather than professional as I can admit to complete this, it will probably take a lot longer than a summer break and might even take me years to fully explore it. However, my passion for the subject will drive me to expand upon this research and all of its potential applications to the point where I already have a plan for it to work. Essentially, each medium would follow subsequent application processes that I conducted when compiling my work for poster analysis. In my mind, this is how I think it will unfold;
Video Games = Analysis of Cover Art provided from examples given in Genre Research, as well as Collage application of the cover art compiled in the research as well as works within my own collection (of which I have been incorporating genre research application.).
Literature = Analysis of Book Covers provided from examples provided in Genre Research, as well as through the process of collage I will showcase the covers from the body collected in my research as well as the covers of books within my own collection (of which would have been subjected to genre research application.).
Television = Analysis of Title Cards and how they evolve throughout the show’s life, taking notes on shifting visual differences as well as other detailing aspects. These title cards will be subjected to the same collage and genre research applications as the other mediums.
Music = Analysis of Album Covers chosen from examples within Genre Research, as well as doing the due diligence of applying the process of collage to both the covers provided in the body of research as well as the covers that are present in the music I have been compiling over the past few years.
Again, I don’t expect this body of work to be done by the time the master’s degree ends but I wanted to show how passionate I am for the research into genre and how I will continue to look into it long after the course is completed.
Next Steps of Research – Age Rating Classification
Through observing narratives over this year in detail, I realised that my research had a gap that I wanted to address. I have always been curious about the decision process of giving something an age rating and what guidelines are put in place, not knowing what it takes for a project to go from one age rating to the next. With this curiosity, I started to look into the British Board of Film Classification (BBFC) guidelines and what aspects they look for within a film to determine where it ranks in regards to giving it an age rating. My hopes from this were to create a series of characterisations of each age rating, showcasing the increasing elements and changes of what is acceptable depending on the rating given to a film. However, upon my initial research into the topic, I found that classification agencies look at a wide variety of different things when coming up with a decision to give a film an age rating.
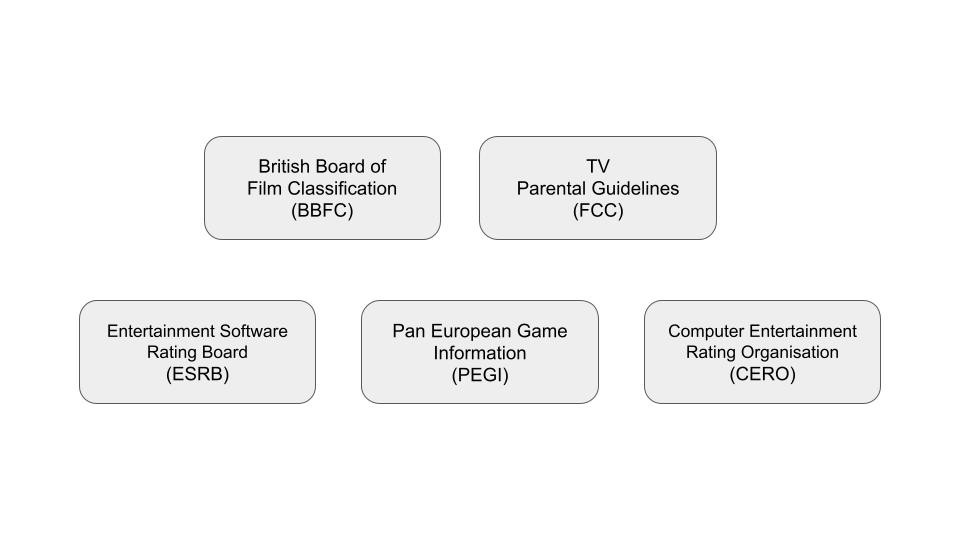
Since I was looking into this topic only a couple of weeks ago, I thought it would be a bit wrong to rush this research as if I want to look more into working in the field of writing, I probably should have a better understanding of what to look for within my work and how age-appropriate it all is. That is why rather than look at the guidelines of one agency, I thought it would be a better idea to look into the guidelines of 5 different agencies that span across 3 separate mediums so that I can have a better insight into the world of age rating classification as a whole. The agencies I have decided to look at are as follows (as seen below.)
- British Board of Film Classification (BBFC) – The most common age rating system used in the UK for both Film & TV
- TV Parental Guidelines (FCC) – Mandated by the United States Congress, these guidelines are used to determine what can be shown on television, using a unique system of age ratings. Similarly, there is also a system for US premium cable that includes content advisory ratings that provide guidance on the suitability of a programme.
- Entertainment Software Rating Board (ESRB) – A self-regulatory organisation that assigns age & content ratings, enforces advertising guidelines and ensures online privacy principles for computer & video games in Canada and the United States.
- Pan European Game Information (PEGI) – A European video game content rating system designed to help parents make informed decisions on buying video games.
- Computer Entertainment Rating Organisation (CERO) – a Japanese organisation that rates video games in an alphabetical rating system (rather than a numeric rating system) that helps inform the customer of the nature of the product.
I was hoping to look into the classification guidelines for all my chosen mediums, but from what I can tell from initial research is that there really isn’t an age rating system when it comes to literature but only restrictions in places depending on the subject matter of the books. As far as music goes, the only system in place is putting a parental advisory warning on albums if they contain songs with explicit lyrics. I intend to look more into detail about these topics at a later date but thought it would be better to prioritise my research to mediums that have varying age ratings.
Next Steps of Research – Exploring New Making Techniques
To end my presentation, I wanted to briefly discuss what kind of making techniques I would be exploring in the summer. Due to this module being all about diverting from the usual routine of how I’d conduct my projects, a lot of my experimentation has been based on illustrative practices rather than using 3D methods. Since I come from a maker’s background, I had to hold off making the majority of my experimentation 3D based on the fear that I would hyper-fixate on either a material/process and get so lost in it that I would neglect the other avenues of experimentation and research I was exploring. Therefore, now that this module has come to an end, I can finally itch that maker’s scratch and look into some of the techniques I avoided as new ways of experimentation. Rather than just making objects and pieces, I want to try and find new ways of combining both making and illustrating to find new experimental practices that I can use to inspire my thought process, especially since now that this module is over it’s about time I start to think about what I could make as a final outcome for the next module. The techniques I hope to look at further are as follows;
Paper Cutting – I used to do a lot of experimentation where I would make repetitive patterns out of cutting random shapes into paper. My plan is to either illustrate objects and characters from those cutout shapes, as a fun method of playing with void space, or I would illustrate a character in layers and cut the pieces out to assemble some form of paper puppet that could pop off the page and come to life.
Model Making – As much as I love making Steves and working with fibrous material, I want to explore other ways that I can make a model figure. My attempts with polymer clay kind of put a hitch in these plans but that won’t stop me from researching other methods and finding safer materials that I can work with.
Environment Building – Since a lot of my research has been on characters, I feel like I have neglected ways I can bring them more depth in a 3D way. That is why I am hoping to start to play around with making 3D elements so that if I do make models of characters, they have things to interact with. These things would range from habitats for them to reside in or objects that they can hold or wear on their person.
Stop Motion Animation – As a maker who has a passion for storytelling and repetitive processes, this just seemed like the next logical step in finding a new practice to look into. I have always had a love of stop motion in film and to not take the opportunity to experiment with the process itself to see if I enjoy it just seems like a wasted opportunity.
There you have, that is my presentation of everything I have thought about, looked at, and muddled with throughout this module! In conclusion, I think this overall experience has been a delight. The opportunity to what I have been seeing as side projects to make my main focus for a project has rekindled my passion for being an artist. I have never felt more proud of myself as a storyteller and with all of this newfound knowledge and next steps, I definitely have a lot to keep me going and to keep me developing. My apologies if everything you’ve seen has been overwhelming, I have been told my work has that effect on people. I just wanted my speaker notes to contain as much depth as I could possibly cram into them, mainly because when I speak out loud I tend to rush through things and never get my actual point across. If anything I wanted this portfolio to be more than just a submission, but a personal look into what happens when you give me no restrictions on a project and I allow myself to naturally draw conclusions to avenues of exploration rather than just rushingly pruning them in the hopes of creating a final outcome.

